UniFi UDM Pro Python Tools: Modular CLI Scripts for Automation
Modular Python CLI scripts for read-only UniFi UDM Pro automation — inspect firewall policies, groups, port forwards, routes, and DNS records.

I’ve been spending a lot of time thinking about how I want to automate my homelab — and how to do it in a way that’s safe, repeatable, and doesn’t turn into “oops, the bot changed my network.”
I’ve been building an n8n-based AI chatbot and expanding its capabilities one tool/action at a time. It started off pretty tame: run updates on my Docker hosts, reboot a VM in Proxmox, that sort of thing. Then the other day I needed to update a port forward on my UDM Pro, and that was the moment I realized I wanted something more deliberate than “AI, go change networking stuff.”
That’s basically how this project was born: a pile of small, modular Python scripts I can wire into n8n later, where each script does one thing and I can control exactly how (and when) it runs.
And yes — I used AI to help build portions of this library, mostly for researching endpoints, planning the script breakdown (one action per file), and speeding up bulk testing. But I still had to make tweaks and changes as needed to make things work correctly in the real world.
In this post, I’m focusing on the read/view scripts — the safe, visibility-first part of the project.
Note: The repo includes create/update/delete scripts too, and I’ve done basic testing on port forwards, group edits, and firewall changes. But this post is intentionally scoped to read-only usage, because I like my firewall rules the same way I like my coffee: not accidentally modified.
Quick shout-out (seriously)
This project includes a git submodule called unifi-network-mcp, which I used as a reference implementation to understand UniFi API endpoints and patterns.
- The upstream project is by sirkirby: unifi-network-mcp
If you click through and give that repo a star, you’re supporting something that personally saved me a ton of time. Go do the good deed.
What you’ll get from this post
By the end, you’ll be able to:
- Create a local UniFi admin account suitable for API access
- Build a Python virtual environment on macOS
- Configure the tool via
.env(with optional encrypted password storage) - Run a “hello world” command (
list_policies.py) - Use the read/view scripts to inspect:
- Firewall policies
- Firewall groups
- Port forwards
- Static routes
- DNS records (policy-based static DNS)
- Zone-to-zone traffic analysis
Prerequisites (macOS)
- A UniFi Dream Machine Pro (or UniFi OS controller with Network application)
- A Mac with:
python3git
- Network access to your UDM Pro’s management IP
Note: These steps are confirmed working on my Mac. In most cases (since this is Python), the same flow should work on Linux and Windows too — your mileage may vary.
Step 1: Create a UniFi account for API access (local admin)
These scripts authenticate against your UniFi controller. For best results, use a local administrator account, not a cloud/SSO identity.
On your UDM Pro:
- Open the UniFi OS console (usually
https://<udm-ip>) - Go to People (wording varies by UniFi OS version)
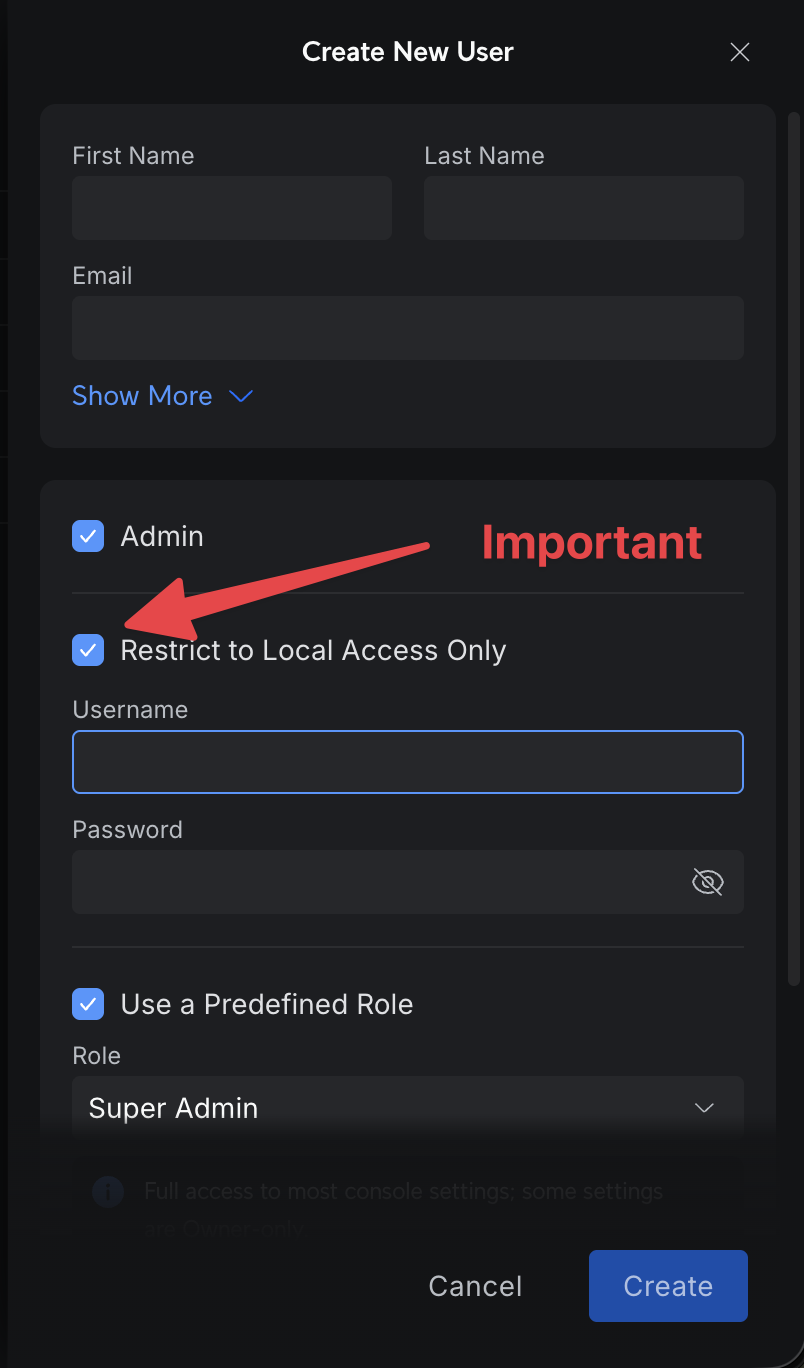
- Click Create New User
- In the Create New User dialog:
- Check Admin
- Check Restrict to Local Access Only (this is the key part that makes it a local account)
- Set a Username and Password
- Choose a role (for easiest setup/testing, you can use read-only)
Security note: If you’re going to expand from “read” into “write” operations later, use the principle of least privilege. Create a dedicated automation account, and don’t reuse your daily-driver admin account.
Step 2: Clone the project
Cloning the repo to your local computer is mostly about getting started quickly. Once you understand the structure, you don’t actually need the whole repo to run a single “one action per file” script — you can copy the minimal files you need into a folder and run from there.
“Minimal folder” example (just list_policies.py)
If all you want is to list policies, the minimum set of files you need in one directory is:
list_policies.pyunifi_client.pypassword_manager.py(required for the encrypted password flow)requirements.txt
Your directory could look like this:
1
2
3
4
5
6
7
unifi-mini/
├── list_policies.py
├── unifi_client.py
├── password_manager.py
├── requirements.txt
├── .env
└── .env.password.encrypted
Then you’d cd into that folder, set up the venv, create your .env, encrypt the password, and run python list_policies.py.
I’m going to stick with the git clone method below since it’s the simplest way to follow along for the rest of this post.
Ok, back to the git clone method
1
2
git clone --recursive https://github.com/SpaceTerran/udm-python-tools.git
cd udm-python-tools
Example output (trimmed):
1
2
Cloning into 'udm-python-tools'...
...
Step 3: Create and activate a virtual environment
1
2
python3 -m venv venv
source venv/bin/activate
You’ll know it’s active when your shell prompt starts with (venv).
Example output (trimmed):
1
2
(venv) $ python --version
Python 3.14.2
Step 4: Install dependencies
1
pip install -r requirements.txt
Example output (trimmed):
1
2
3
Collecting requests>=2.32.0 (from -r requirements.txt (line 1))
...
Successfully installed certifi-2026.1.4 cffi-2.0.0 charset_normalizer-3.4.4 cryptography-46.0.3 idna-3.11 pycparser-2.23 python-dotenv-1.2.1 requests-2.32.5 urllib3-2.6.3
Step 5: Configure .env (and don’t leak secrets)
Copy the example file and edit it:
1
cp .env.example .env
At minimum, you’ll configure:
UNIFI_HOST(UDM Pro IP / hostname)UNIFI_USERNAME(the local admin user you created)UNIFI_SITE(usuallydefault)UNIFI_VERIFY_SSL(falseis common for self-signed certs)
Password handling (encrypted)
I’m only covering the encrypted setup in this post. (Yes, there are ways to run this without encryption, but I’m not covering that here.)
To store your password encrypted:
1
python3 password_manager.py encrypt "your_password_here"
That writes your encrypted password to .env.password.encrypted (and the repo is configured to ignore it).
Important: Treat
.env,.env.password.encrypted, and script output as sensitive. Don’t commit them, don’t paste them into public issues, and don’t drop them into chat tools unless you really mean to.
Step 6: “Hello world” (prove auth works)
Let’s start with the one command that tells you everything is wired up correctly:
1
python list_policies.py
If authentication works, you should see something like:
1
2
✓ Successfully authenticated to <your-udm-host>
Fetching firewall policies...
From here, you’ll use the IDs printed by list_policies.py to drill into details.
Read-only commands
This is the “tour” section: I’ll walk through the read-only scripts in a practical order — list first, then view/search, then move on to groups, port forwards, routes, DNS records, and finally a zone-to-zone traffic analysis.
The commands are all shown in the sections below, so you can copy/paste as you go.
Reminder: Activate your venv before running scripts:
source venv/bin/activate
Firewall policies
- List policies:
1
python list_policies.py
- View one policy (full detail + JSON):
1
python view_policy.py <policy_id>
Use the full policy ID (not the truncated one shown in the list output).
- Search policies (name, port, IP, zone, protocol, action, enabled):
1
2
3
4
python search_policies.py --name cloudflare
python search_policies.py --port 443
python search_policies.py --port 443 --action allow
python search_policies.py --enabled true
Firewall groups (address groups / port groups)
- List groups (optional name filter):
1
2
python list_groups.py
python list_groups.py cloudflare
- View group detail + members + JSON:
1
python view_group.py <group_id>
Port forwards
- List port forwards:
1
python list_port_forwards.py
- View one port forward (full detail + JSON):
1
python view_port_forward.py <rule_id>
UniFi auto-generates firewall rules for port forwards (often at indices (30000+)). Don’t be surprised when you see “extra” rules in your policy list.
Static routes
- List static routes:
1
python list_static_routes.py
- View a specific route:
1
python view_static_route.py <route_id>
DNS records (policy-based static DNS)
The repo uses policy-based static DNS (UniFi Network → Settings → Policy Table → DNS Records). List and view by domain or record ID:
- List DNS records (optional domain filter):
1
2
python list_policy_dns_records.py
python list_policy_dns_records.py server
- View a DNS record (by domain or record ID):
1
2
python view_policy_dns_record.py myserver.example.com
python view_policy_dns_record.py <record_id>
Zone-to-zone traffic analysis (super handy for audits)
This one is a “read-only plus brain power” script. It looks at policies between two zones and summarizes what’s allowed vs blocked.
1
python analyze_zone_traffic.py --src-zone <source_zone_id> --dst-zone <destination_zone_id>
Optional filters:
1
2
python analyze_zone_traffic.py --src-zone <src> --dst-zone <dst> --action allow
python analyze_zone_traffic.py --src-zone <src> --dst-zone <dst> --action block
A quick note on UniFi API rate limiting (and why I built in backoff)
UniFi will rate limit you if you hammer the API, especially if you run multiple scripts back-to-back (or you’re iterating quickly while building/testing). When that happens, you’ll typically see HTTP 429 responses.
Instead of making you babysit retries, I tried to make the client behave like a polite adult:
- Detect 429 / “Too Many Requests”
- Wait, then retry
- Wait longer each time if UniFi keeps pushing back (exponential backoff)
So you may see warnings like “rate limited… waiting X seconds…” and then the script continues once the controller is ready to talk again. This is intentional — it’s there to make bulk reads and repeated runs less annoying (and to keep you from thinking “is this thing hung?” when it’s really just waiting its turn).
Closing thoughts (and what’s next)
First off — thanks for stopping by. Hopefully this saves you a few cycles…
In my lab, I use these scripts as building blocks inside n8n workflows so the AI can do predictable things like: take an action, validate the result, then move on to the next step. Think of it as “tooling with guardrails,” not a free-for-all.
And even if you never automate a single change, these scripts are still great when you just want clean, formatted output you can use to audit configs, document behavior, and understand your own rulebase before touching anything.
- Repo URL:
https://github.com/SpaceTerran/udm-python-tools - Reference submodule (give it a star): https://github.com/sirkirby/unifi-network-mcp
If you end up using this, I’d love to hear what you’re automating in your lab (and what UniFi task you wish was easier). Drop a comment and let’s compare notes.
Update: DNS scripts (policy-based static DNS) (Jan 31, 2026)
Original post: Jan 19, 2026. The repo’s DNS scripts were updated after this post was published. The project now uses policy-based static DNS (UniFi Network → Settings → Policy Table → DNS Records; API /proxy/network/v2/api/site/{site}/static-dns). The earlier scripts (list_dns_records, view_dns_record, create_dns_record, etc.) targeted local/client hostnames (per-device, MAC-based; UniFi “user” API with local_dns_record). That was not the originally intended design. If you’re following this post and want to work with gateway-level static DNS (e.g. myserver.example.com → 192.168.1.100), use the new scripts instead: list_policy_dns_records.py, view_policy_dns_record.py, create_policy_dns_record.py, update_policy_dns_record.py, delete_policy_dns_record.py. See the repo README for usage and JSON format.
Note: UniFi/UDM Pro are trademarks of Ubiquiti Inc. This project isn’t affiliated with Ubiquiti. The unifi-network-mcp submodule is the work of sirkirby and is included here as a reference. Third‑party Python packages are used under their respective licenses (see requirements.txt).