Step-by-Step Guide: Enabling Intel® vPro™ on Your Minisforum MS-01
Complete BIOS configuration guide to enable Intel vPro and AMT on the Minisforum MS-01 for remote KVM access using MeshCommander.

Configure Minisforum MS-01 BIOS to Enable Intel® AMT/Intel® vPro™
Before diving in, I want to mention that I made several adjustments to the power management settings. While my objective wasn’t to achieve the most optimized or power-efficient setup, these changes ensure that the network adapters are consistently available, both for Wake On LAN and AMT/vPro. Your setup requirements may differ. Note: I will not cover Wake On LAN in this post.
Accessing BIOS
First, press the Del key on your keyboard during boot-up. Ensure you have a monitor connected to the device.
Note: I typically use my PiKVM v4, but for some reason, the video wouldn’t come up. Using a physical monitor worked perfectly.
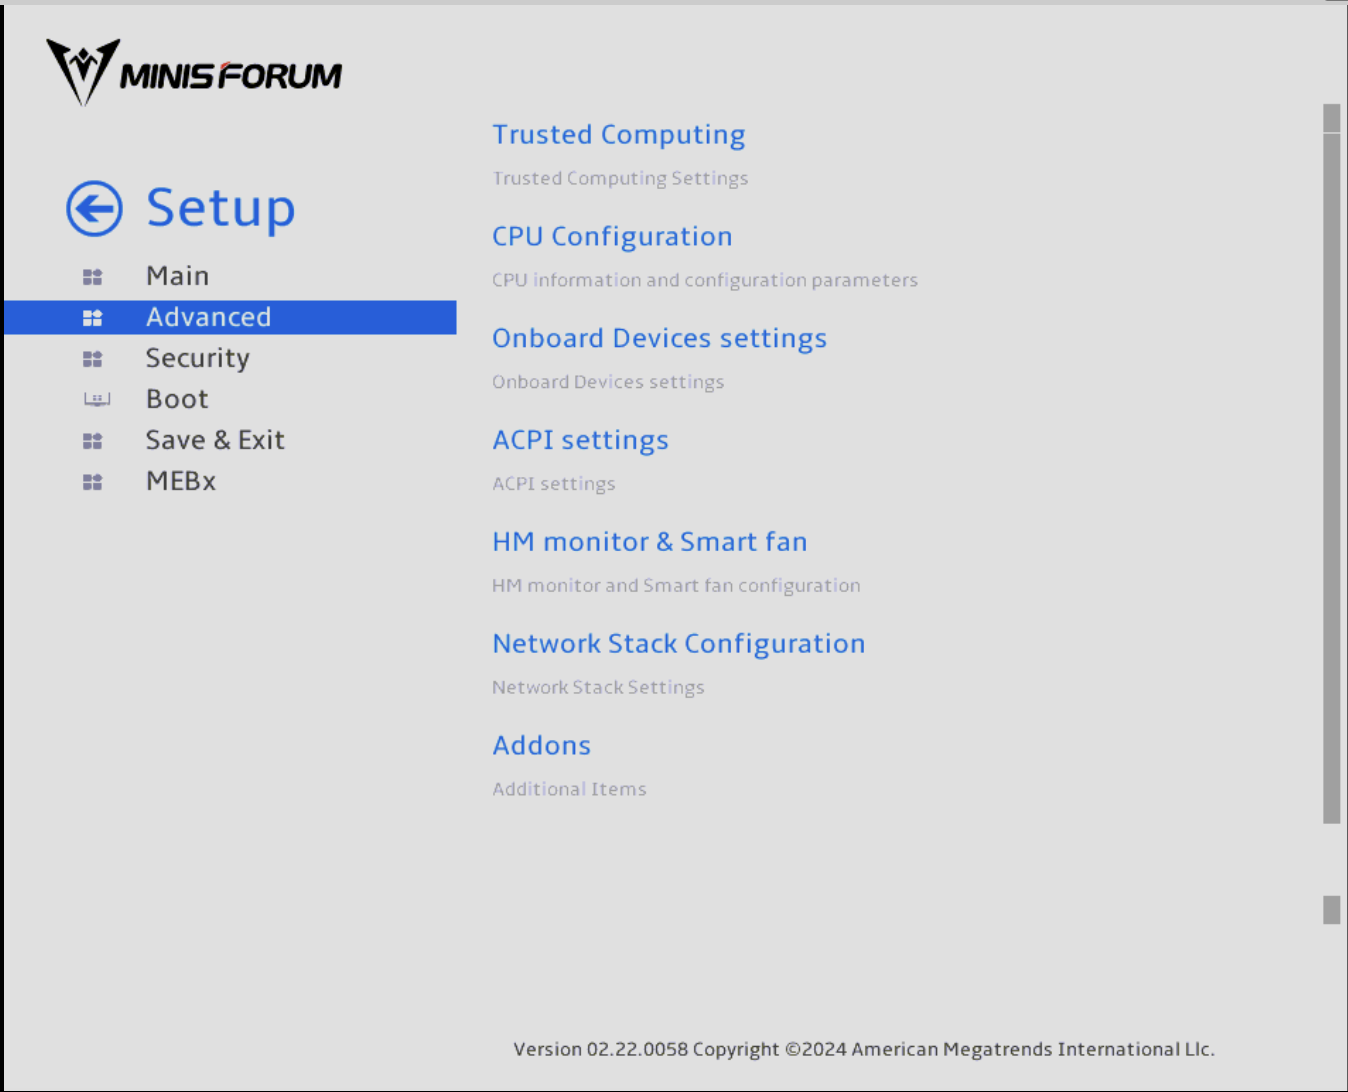
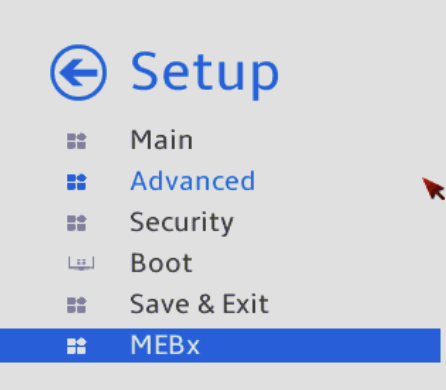
Once in the BIOS, select “Setup”.

Navigate to Advanced, then Onboard Devices Settings.
Disabling ASPM
Set the Primary Display to HG. I’ve faced inconsistent results when leaving this on Auto.

Select SA-PCIE Port.
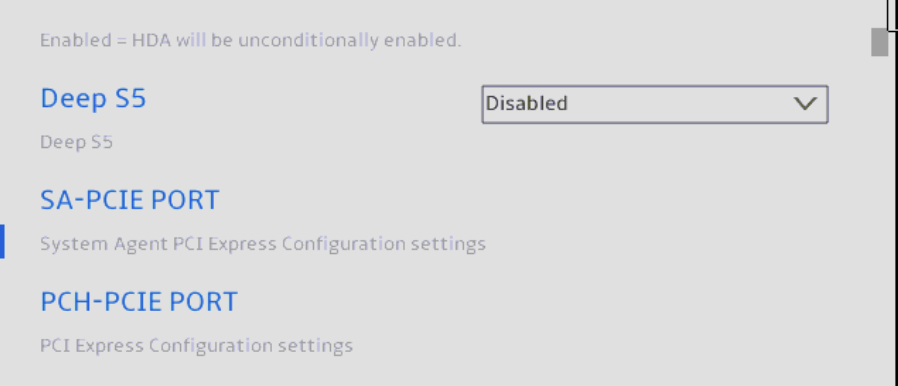
Ensure your screen resembles the image below. ASPM should be disabled at every occurrence. Once done, go back one screen and select PCH-PCIE Port.
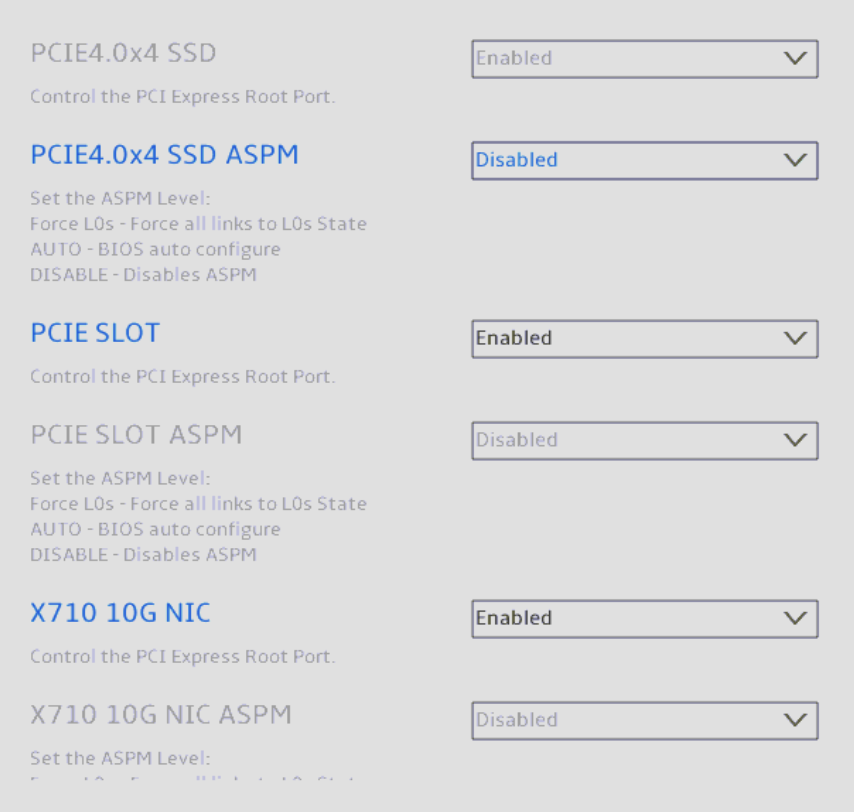
Again, ensure ASPM is disabled everywhere you see it.

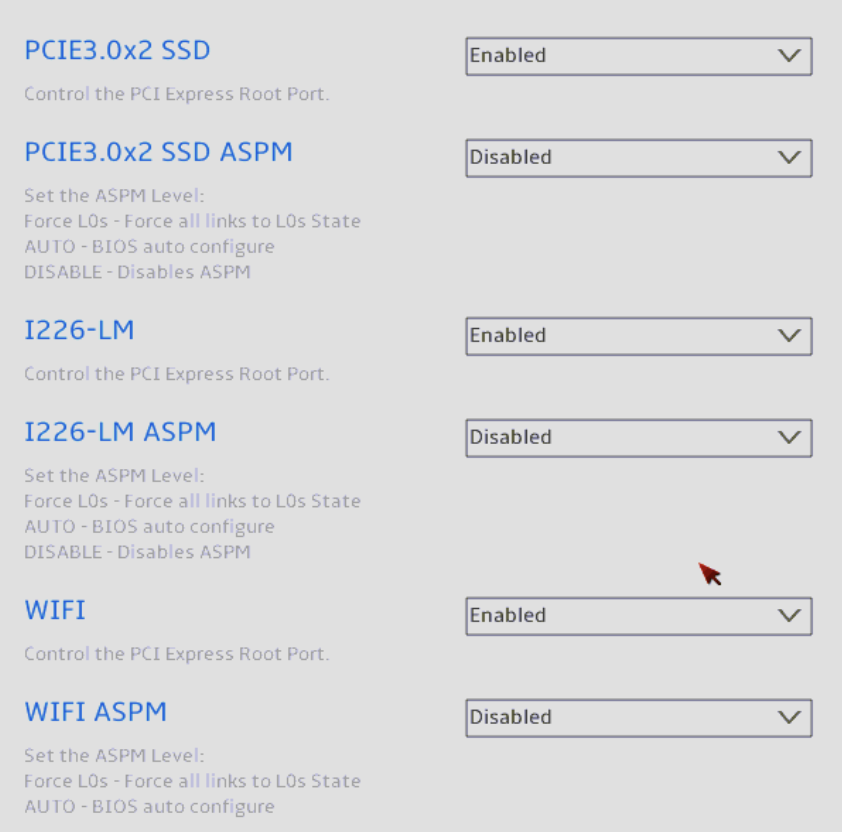
Note: Turning off Active-State Power Management (ASPM) may conflict with your requirements. If you need or prefer to leave some of these settings enabled, be aware that one of your devices may become unavailable if the OS determines it is not needed. For the AMT/vPro NIC, this would mean remote rebooting a hung system or turning the machine back on would become impossible.
Configuring MEBx
Return to the main menu and navigate to MEBx.
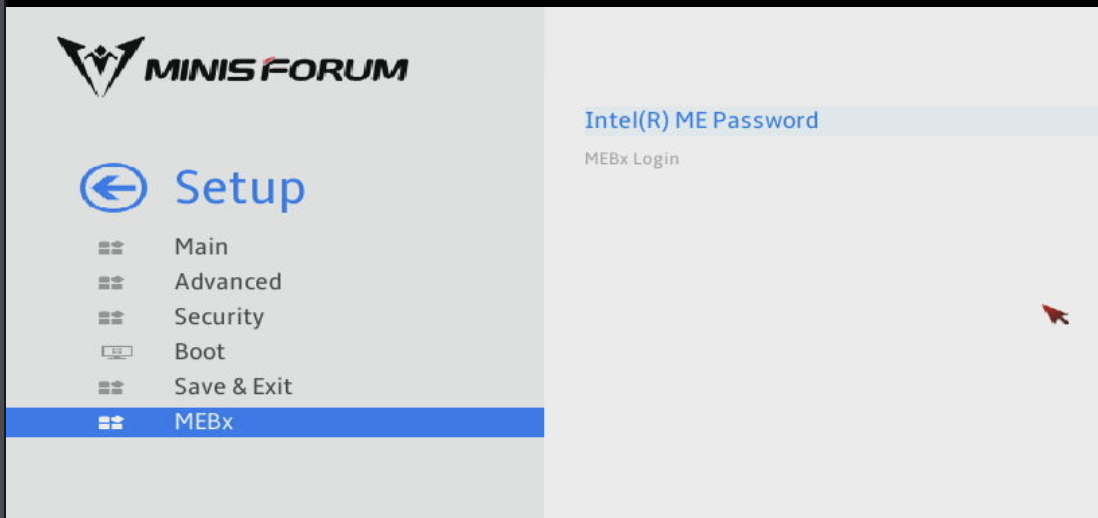
When prompted for the current password, type: admin.
This next part can be tricky. You must create a complex password with at least one special character like ! or $, some letters, and numbers, including at least one uppercase letter. Enter this complex password twice. Until I figured this out, I encountered several errors that didn’t specify a password issue, so don’t get tripped up like I did.
Once past the password setting, you’ll see a screen similar to the one below. Select Intel(R) AMT Configuration.

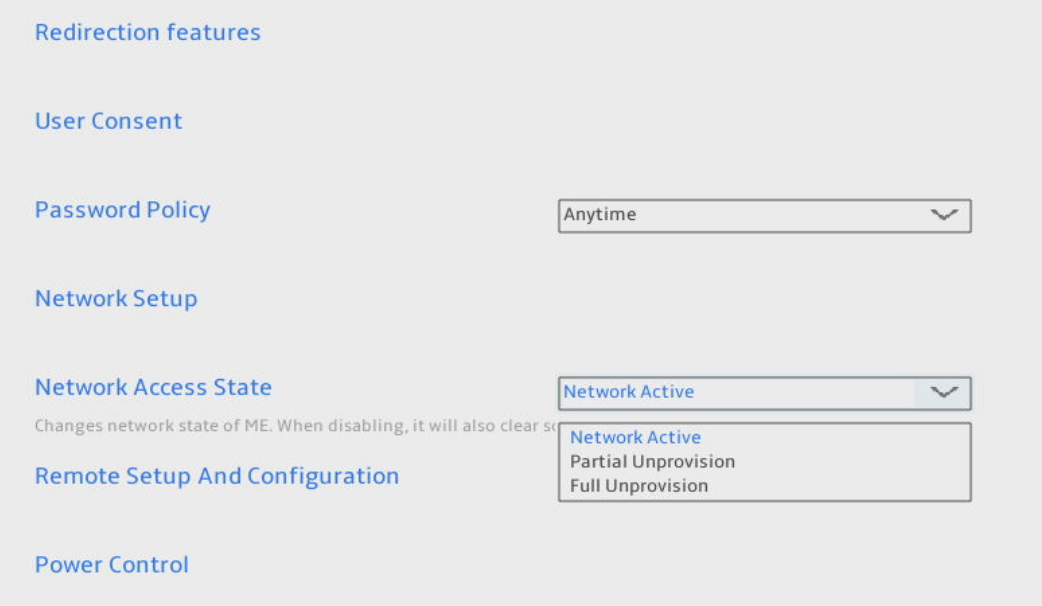
Network Setup
Focus on Network Setup and Network Access State. I’ll share screenshots of all my settings, demonstrating a working state that allowed me to use all the features I needed in a headless setup.
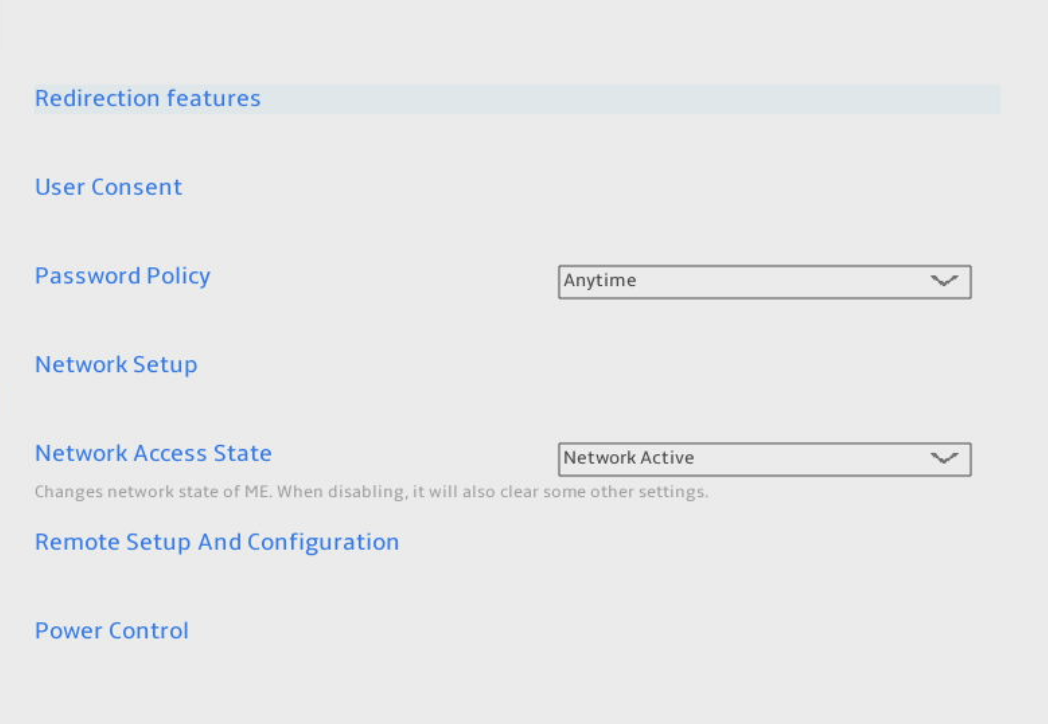
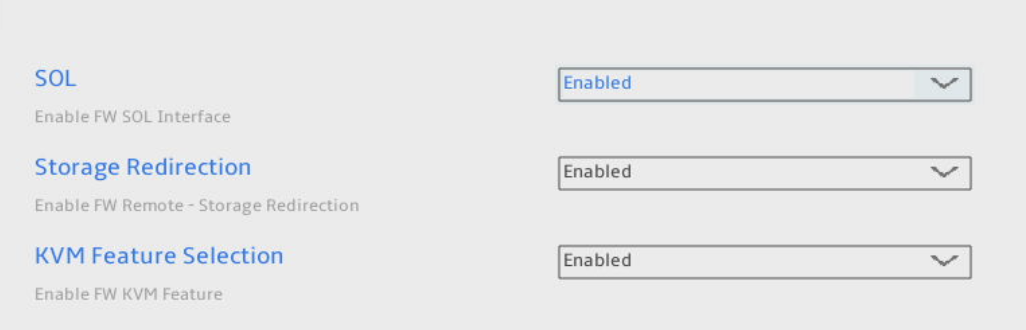
Redirection Features
Ensure everything on this screen is enabled. All items were already enabled on my MS-01, so I didn’t need to change anything.
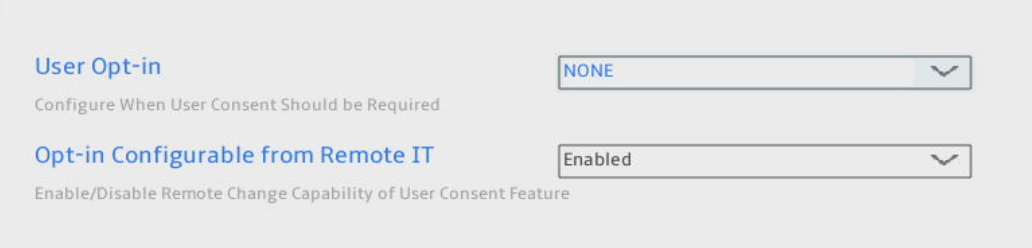
User Opt-in
I changed the User Opt-in to NONE to suit my needs. You can leave this on the default setting if it suits you better.
Network Setup Continued
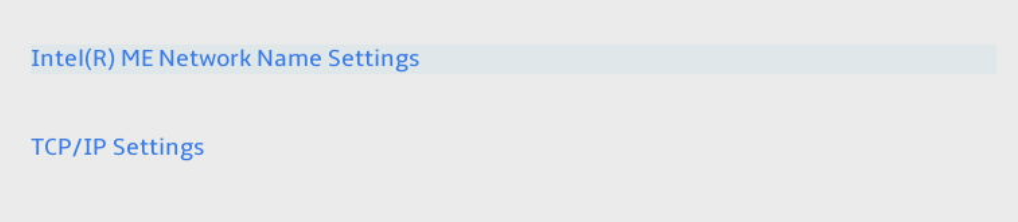
In the Network Setup, select Intel(R) ME Network Name Settings.
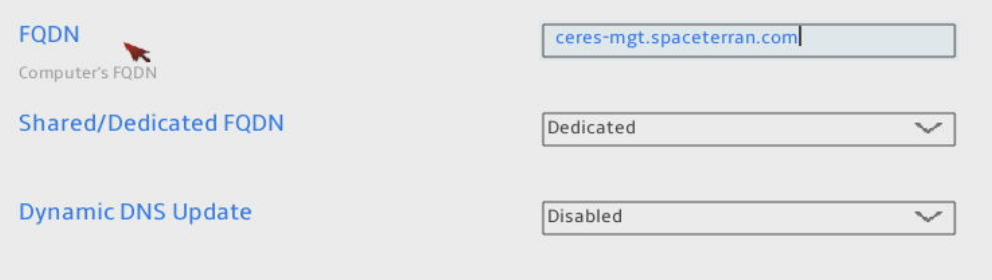
While setting up a FQDN is optional, I recommend it. Setting it as Dedicated ensures no cross-configuration while running Proxmox. Once complete, go back one screen.
TCP/IP Settings
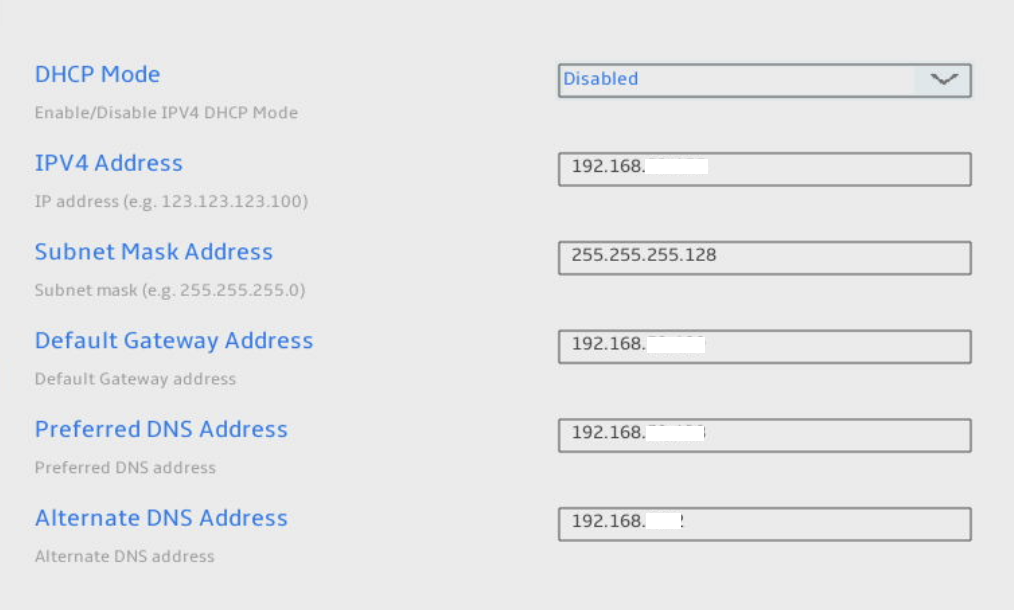
Navigate to TCP/IP Settings, then Wired LAN IPV4 Configuration. This step is crucial. Configuring a static IP isn’t just a best practice; it’s the only method that consistently worked for me. I faced mixed results with DHCP. Additionally, a static configuration ensures you always know where to connect, even if your DHCP fails.
Disable DHCP Mode and fill in the relevant details as shown below.
Go back two screens and change the Network Access State to Active Network. Save & Exit the BIOS.
Fixing the Black Screen Issue
After completing the steps above, you won’t need the monitor plugged in anymore. To ensure you have access to KVM or remote viewing once Proxmox loads, use an HDMI plug, like this one on Amazon: HDMI Plug on Amazon. It comes with three plugs for around $7 at the time of posting. Without this, you’ll see the BIOS, but the screen will go black after anything loads. There are many options available on Amazon, but these are the ones I used and can confirm they work for me.
Connecting to Intel® AMT/Intel® vPro™ with MeshCommander
Initially, accessing the remote console from my Mac seemed almost impossible—though I might be exaggerating a bit. After going through several unhelpful forums, I finally found a valuable thread on ServeTheHome: Getting vPro Remote KVM Working on Minisforum MS-01. The key advice was to use this Docker image locally: MeshCmd on Docker Hub.
From my Mac, I deployed the container using OrbStack, which I recently discovered from Christian Lempa in this video. It’s a bit overkill for this use case, but it gave me a reason to check out OrbStack.
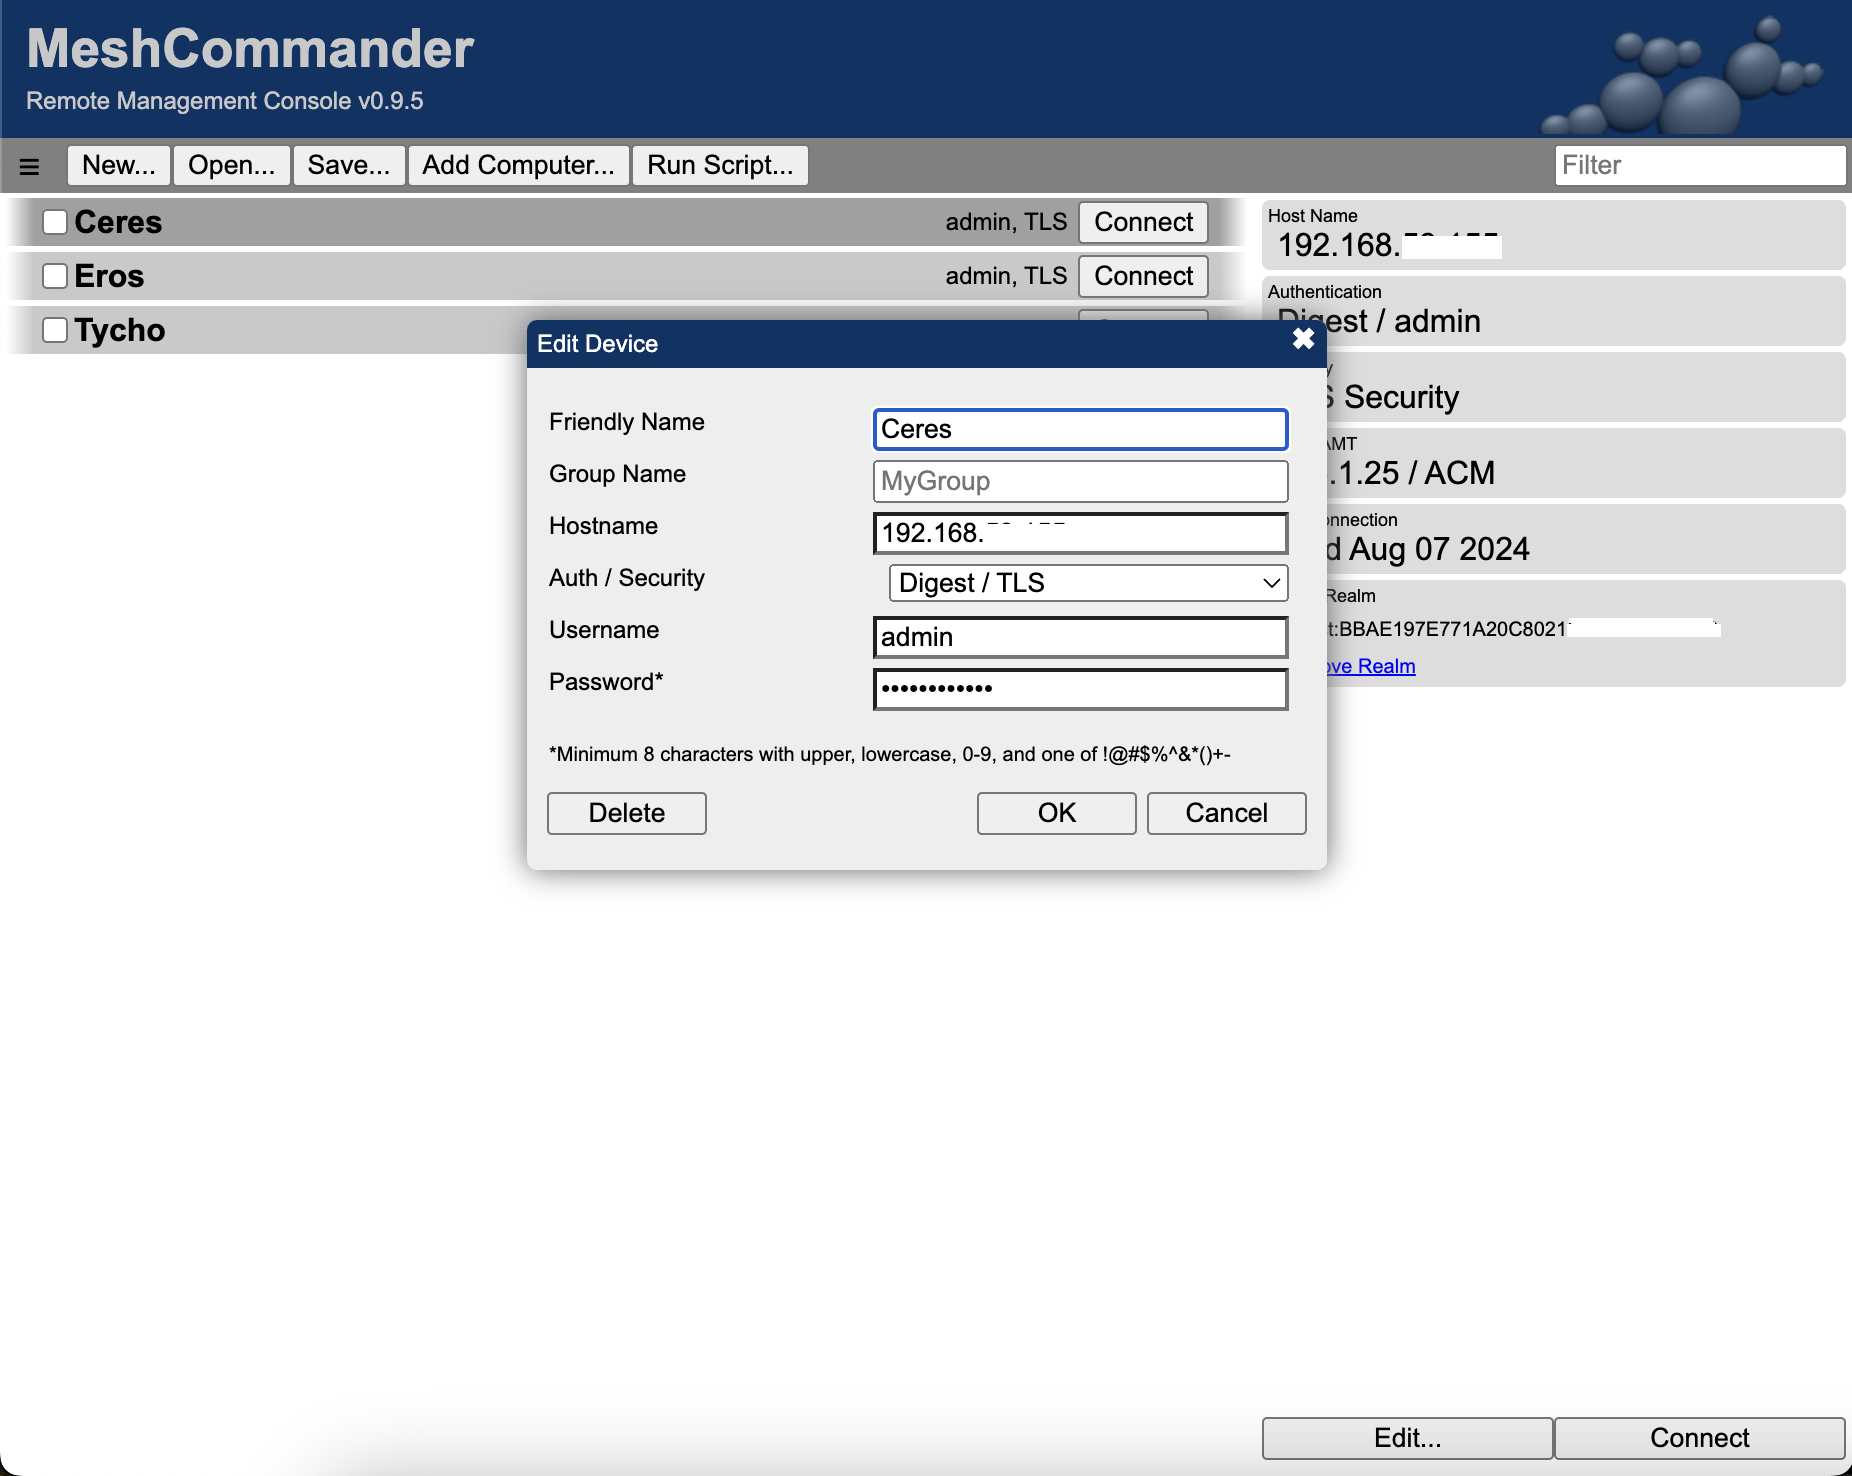
Launch a web browser and navigate to http://localhost:3000. The familiar MeshCommander interface loads, working as expected. Don’t forget to select TLS when adding a new computer. Below is a screenshot with my three nodes configured.
Ensuring AMT/vPro Continues to Work with Proxmox
After setting up AMT/vPro for remote access and installing Proxmox, I noticed that the Proxmox OS interfered with the NIC adapters running AMT/vPro. The NIC would become inactive after a short period. To resolve this, you have two options: blacklist both 2.5GB NICs, or configure the vPro NIC within Proxmox and then use the other as your requirements necessitate.
(Option 1) Blacklisting
This guide will walk you through blacklisting both 2.5GB NICs. I took this approach as I used both 10GB NICs and didn’t need to maintain the usability of the 2.5GB NICs. This may not be best for your situation. If not, continue reading below for another option.
1
ip link show
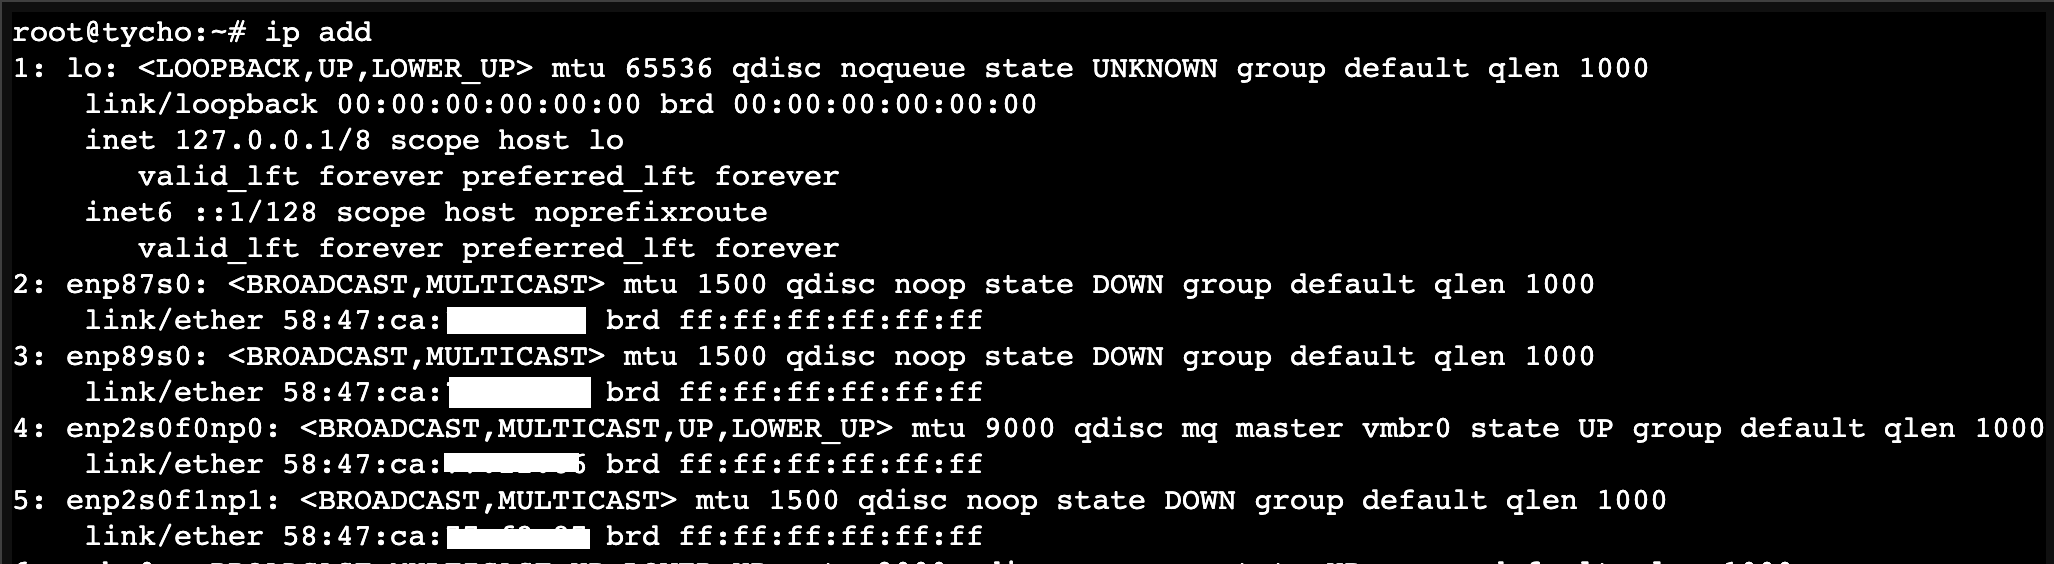
Take note of the adapters with “enp87” or “enp89”; these are the 2.5GB adapters.
1
ethtool -i enp89s0
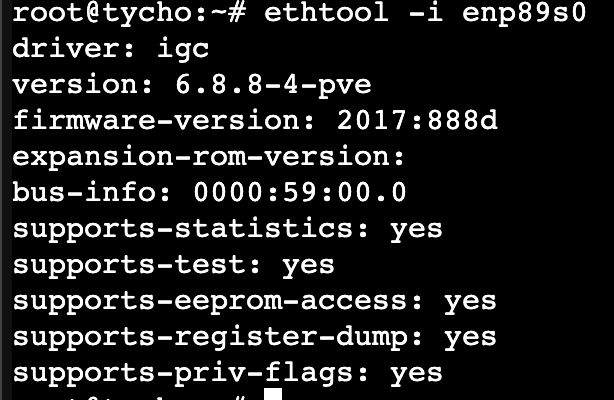
Take note of the driver listed; for the MS-01, it should be igc.
To stop Proxmox from loading the drivers for these adapters, we need to exempt them from Proxmox OS management.
Create the following file:
1
nano /etc/modprobe.d/blacklist-nic.conf
Add the content below to the blacklist-nic.conf file and save it.
1
blacklist igc
Update initramfs and then reboot.
1
2
update-initramfs -u
reboot
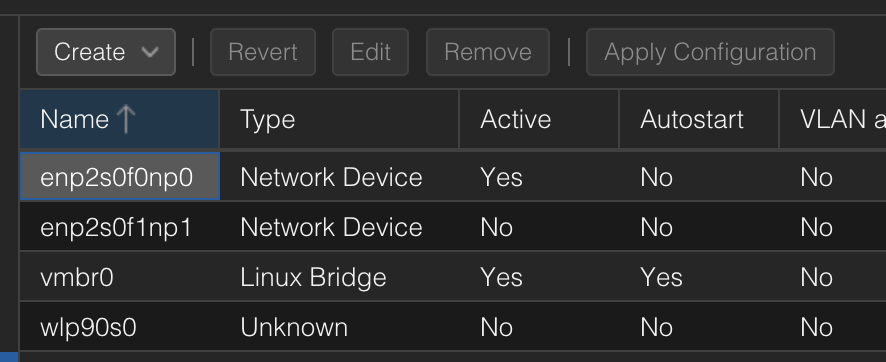
After reboot, the network section of Proxmox should look similar to the below.
Before
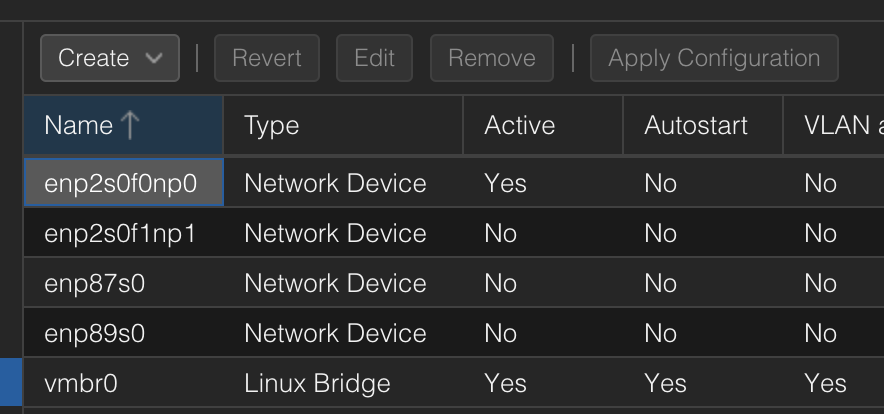
After
(Option 2) Updating/Activating vPro in Proxmox (Maintain the Use of One of the 2, 2.5GB NICs)
1
nano /etc/network/interfaces
Be sure to add auto enp89s0 right above the iface enp89s0 inet manual line. Save and then reboot.
(Interfaces File After Initial Install)
1
2
3
4
5
6
7
8
9
10
11
12
13
14
15
16
17
18
19
20
21
22
23
24
25
26
27
28
29
30
31
32
33
34
35
36
# network interface settings; autogenerated
# Please do NOT modify this file directly, unless you know what
# you're doing.
#
# If you want to manage parts of the network configuration manually,
# please utilize the 'source' or 'source-directory' directives to do
# so.
# PVE will preserve these directives, but will NOT read its network
# configuration from sourced files, so do not attempt to move any of
# the PVE managed interfaces into external files!

auto lo
iface lo inet loopback

iface enp2s0f0np0 inet manual

iface enp87s0 inet manual

auto enp89s0 ## <--- Add this line here
iface enp89s0 inet manual

iface enp2s0f1np1 inet manual

auto vmbr0
iface vmbr0 inet static
        address 192.168.x.x/25
        gateway 192.168.x.x
        bridge-ports enp2s0f0np0
        bridge-stp off
        bridge-fd 0
        bridge-vlan-aware yes
        bridge-vids 2-4094

iface wlp90s0 inet manual

source /etc/network/interfaces.d/*
Closing
This guide covers setting up Intel® AMT/Intel® vPro™, or KVM, on your MS-01. It might be a trivial task for those who regularly use Intel® AMT/Intel® vPro™, but it took me longer than expected, and I couldn’t find a single comprehensive guide. This post aims to consolidate all the steps into one place. Please let me know your thoughts or if you encounter issues in the comment section below.
Updated: 9/16/24 - Rewrote section Ensuring AMT/vPro Continues to Work with Proxmox
Thanks to jamesangi for asking the question in the comments section below, it pushed me to find other options besides blacklisting the 2.5GB NICs. Thanks again!