Hands-On with TrueNAS SCALE 24.10 Electric Eel: Configure Docker Compose and Traefik - Working SSL Certificates
TrueNAS SCALE 24.10 (Electric Eel)
If you’re like me, you want to start using Docker Compose right away on the new release of TrueNAS SCALE 24.10 (Electric Eel). The main reason is that I already have a ton of Docker Compose files that allow me to host my homelab on almost any server, as long as it supports Docker.
Traefik
I am also a fairly big fan of trusted SSL certificates for my various self-hosted applications. I use Traefik, thanks to Christian Lempa way back when, who brought it to my attention initially. Once I deployed it once, I never wanted to go back!!! While this is just a few days from the release of TrueNAS Electric Eel, when I went to the Apps catalog in TrueNAS it wasn’t listed.
Again, these are early days and it’s quite possible that by the time you read this, it will be a published application by iXsystems, but I didn’t want to wait. I had workloads I wanted to move over!!!!!
Additionally, it looks like Docker Compose support, again in the early days, really isn’t available within the GUI. Or maybe I’m blind… Either way, I didn’t want to wait. This tutorial is, well, breaking all the rules… making changes directly to the TrueNAS OS, and will most likely make your instance not supportable. And frankly, you probably shouldn’t do this… But if you’re like… SEND IT!!! then keep on reading.
Enabling SSH Access
Start off by enabling SSH access to your TrueNAS. You don’t need this step strictly speaking, but it’s a bit nicer to use your terminal of choice versus the web interface.
Option 1 (Recommended):
- Log in as normal to your TrueNAS instance.
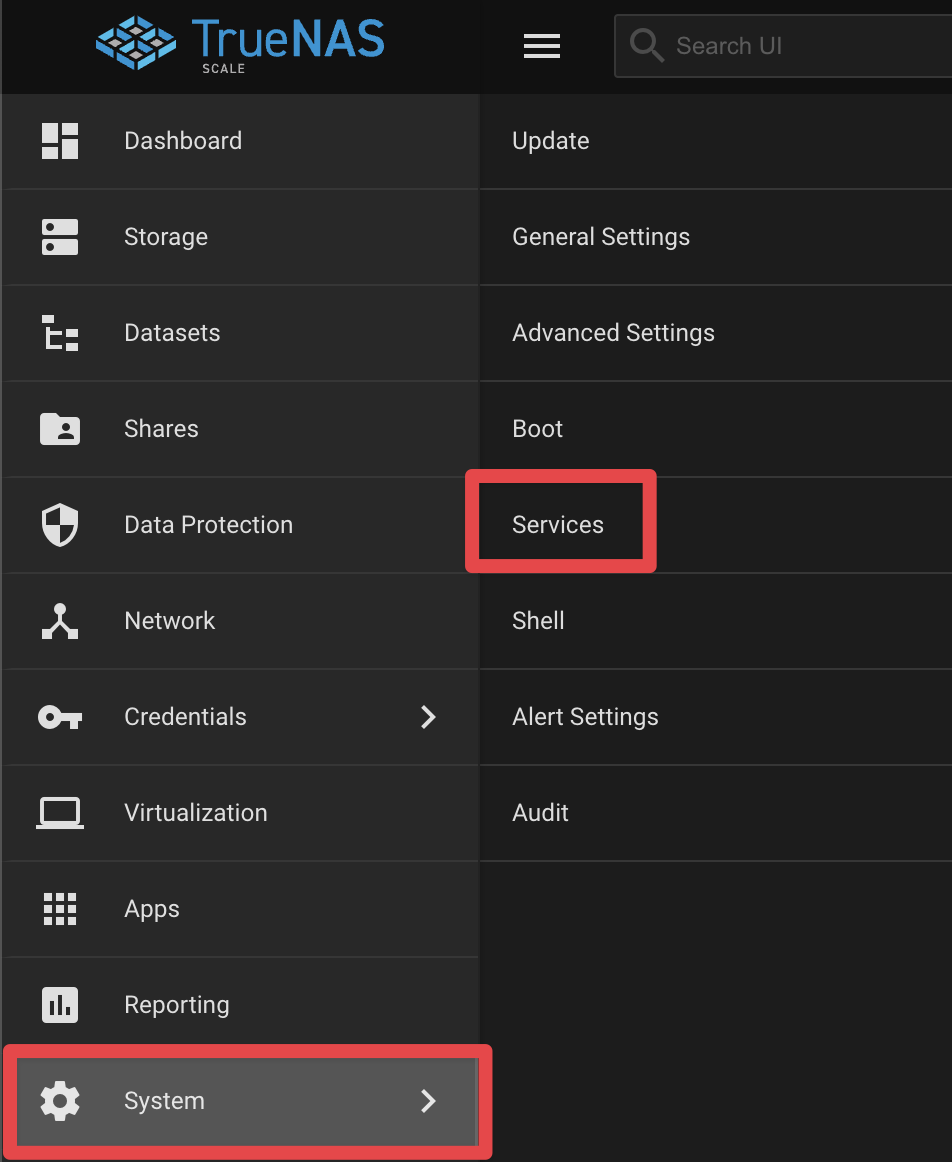
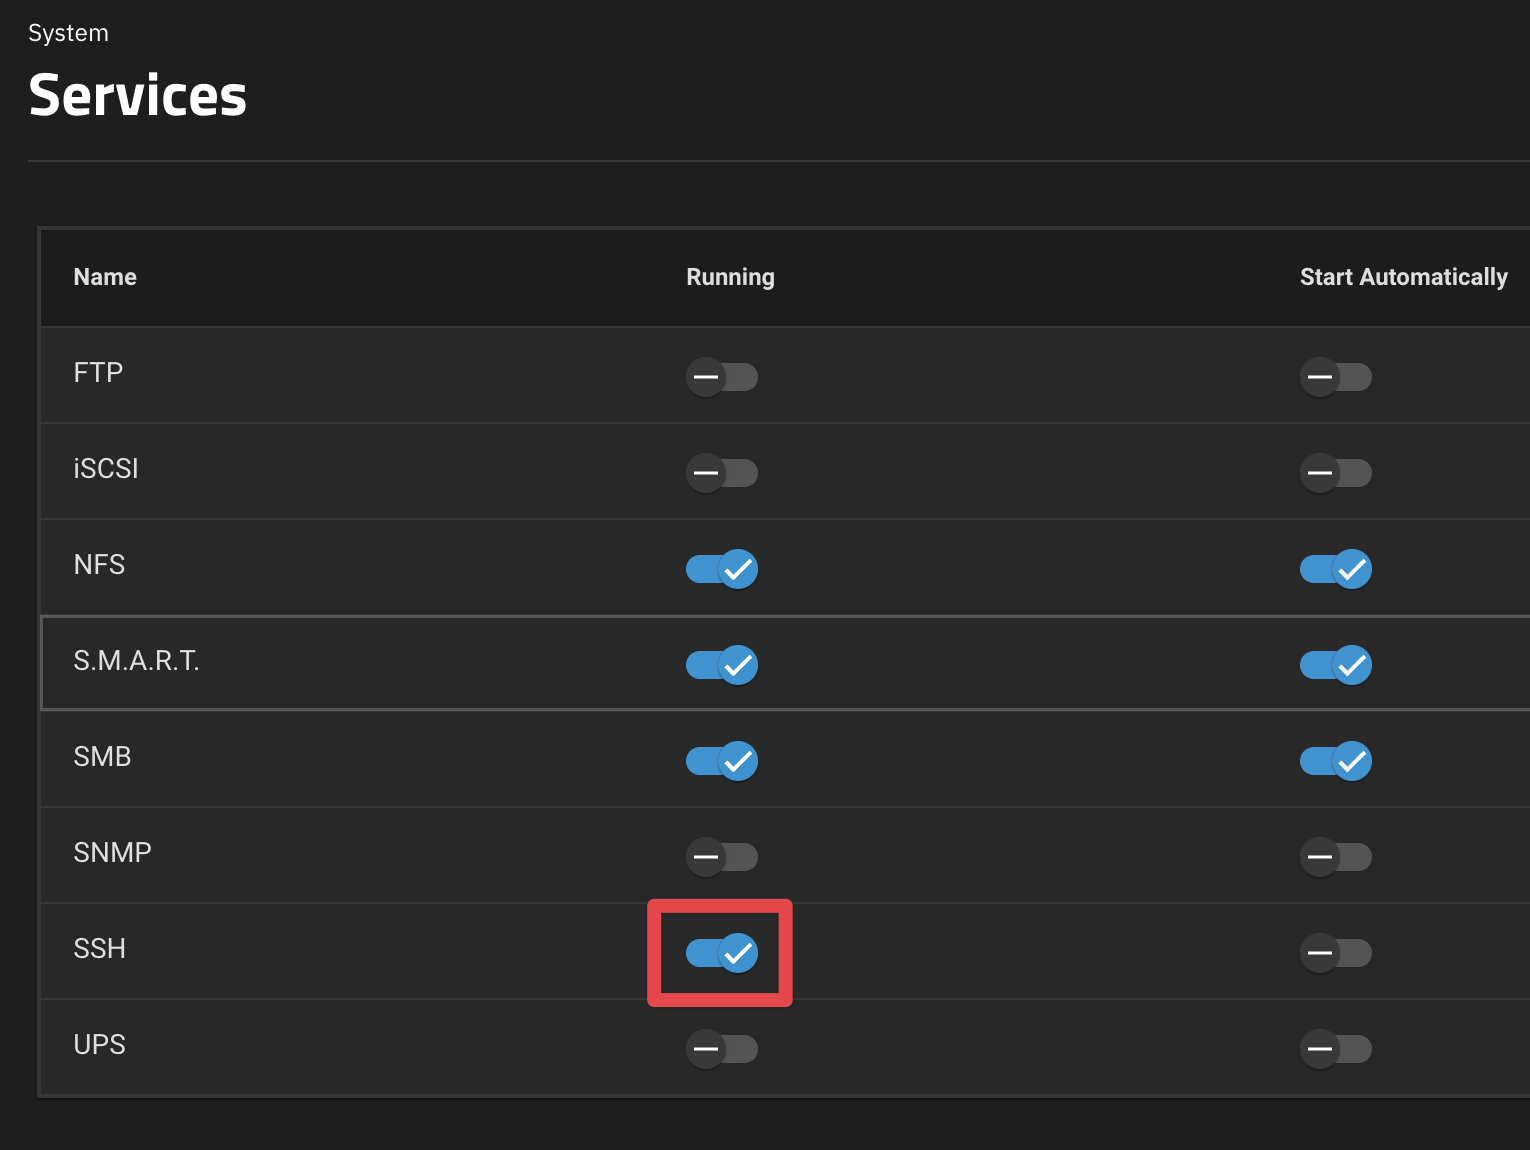
Navigate to System, then Services, and finally tick the box to enable the SSH service if not already running.
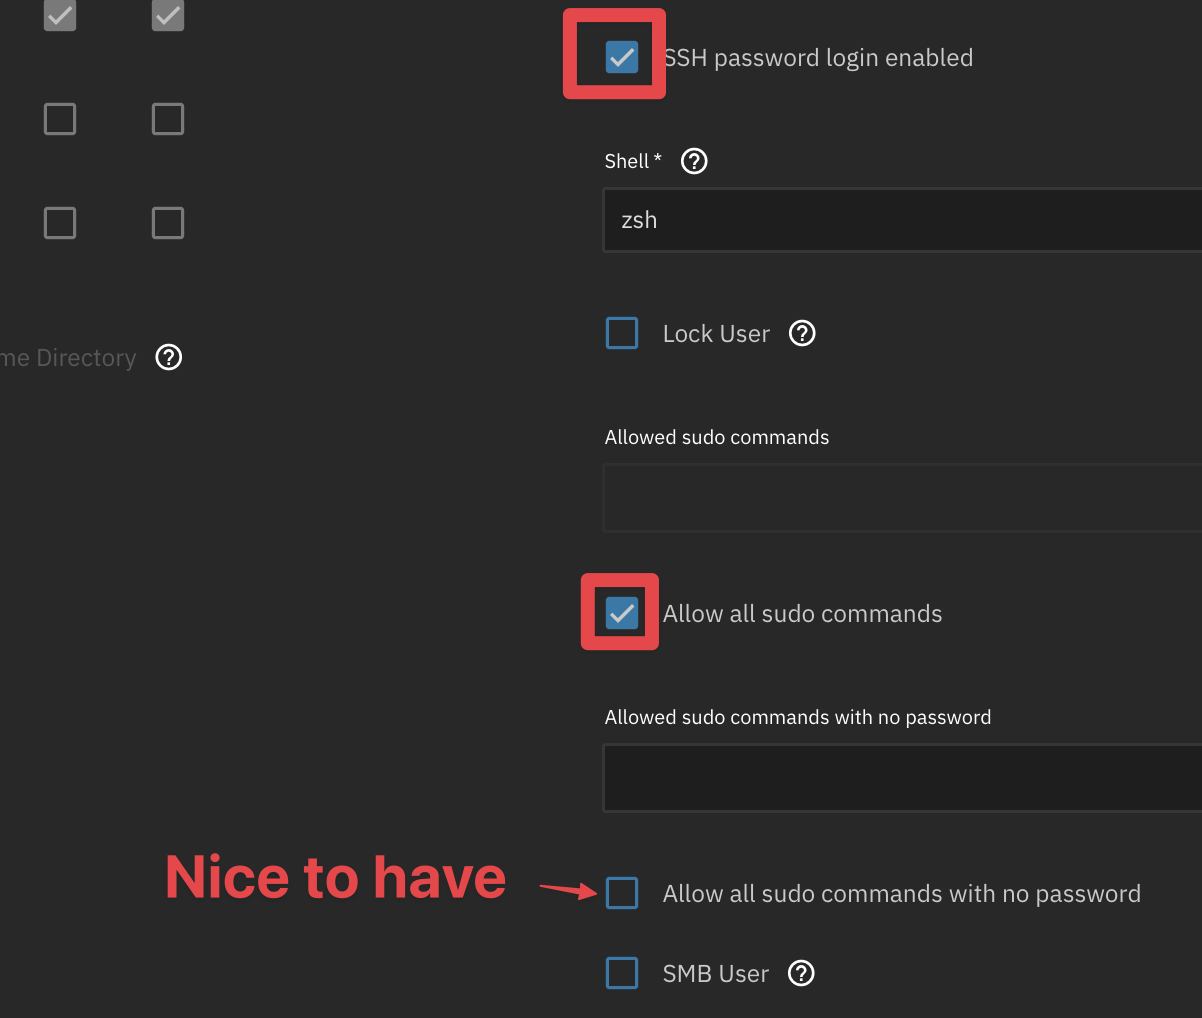
- Lastly, ensure your admin account has SSH login access. Navigate to Credentials -> Users -> Admin, then select Edit.
Ensure you turn this off once you are done! It’s not the best idea to leave SSH running and allowing remote access to your TrueNAS unless you have to.
Option 2:
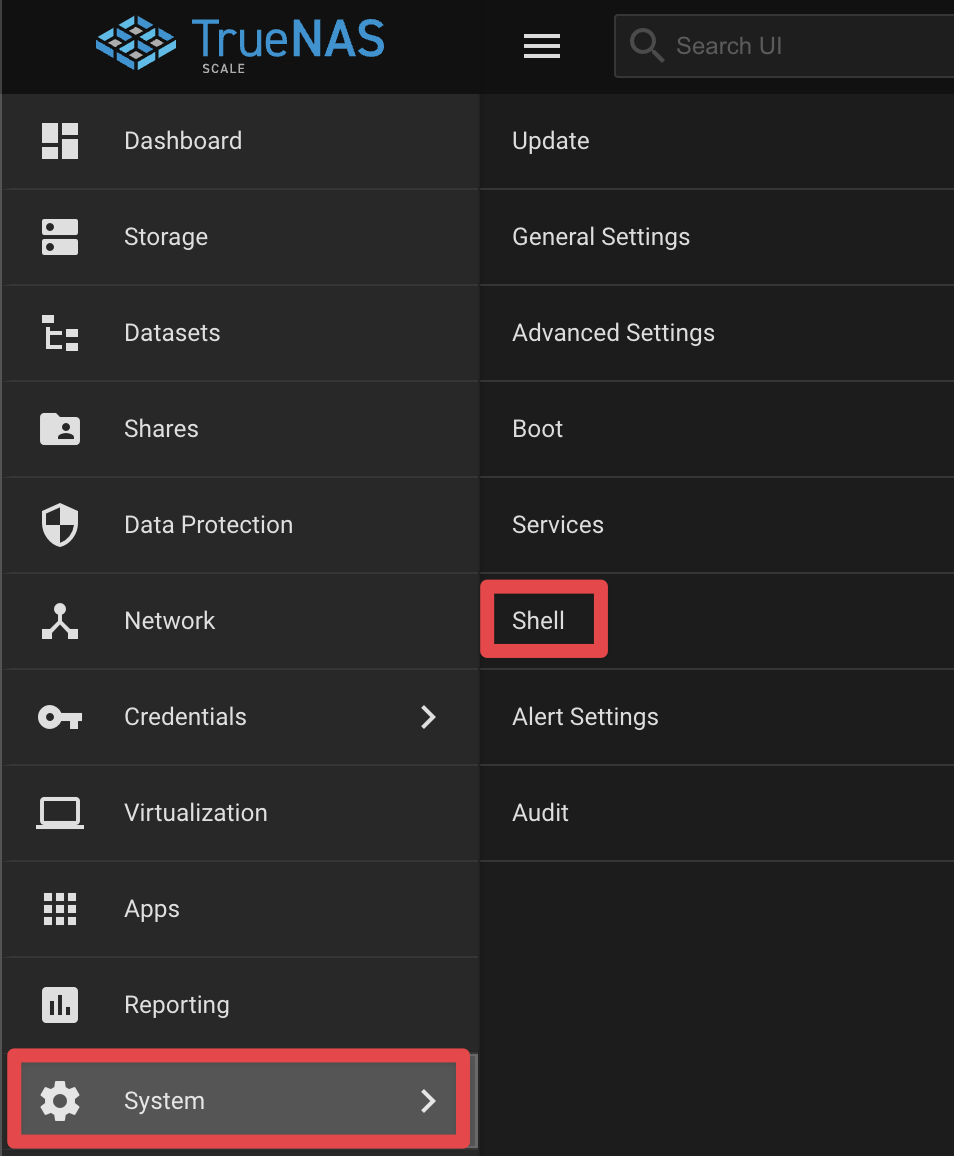
Navigate to System then Shell.
GUI Changes for Ports
Now we need to make a couple of changes in the GUI. It’s very possible these could be command line items, but you know… sometimes it’s just quicker, so here we go.
Changing Default Ports
Navigate to System -> General Settings -> Under GUI, select Edit.
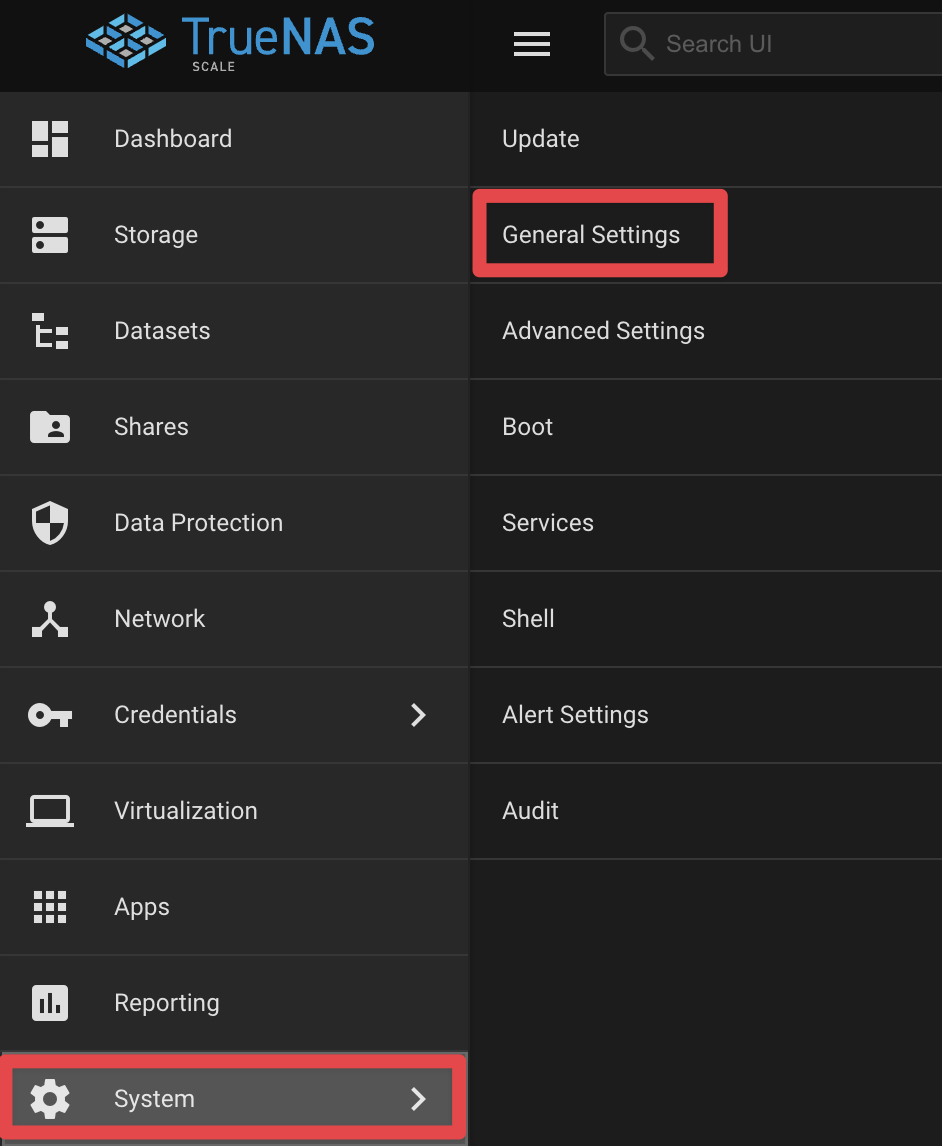
Set port 80 to 8080 and 443 to 4433. Remember, after you hit save, you will need to change the port in your URL.
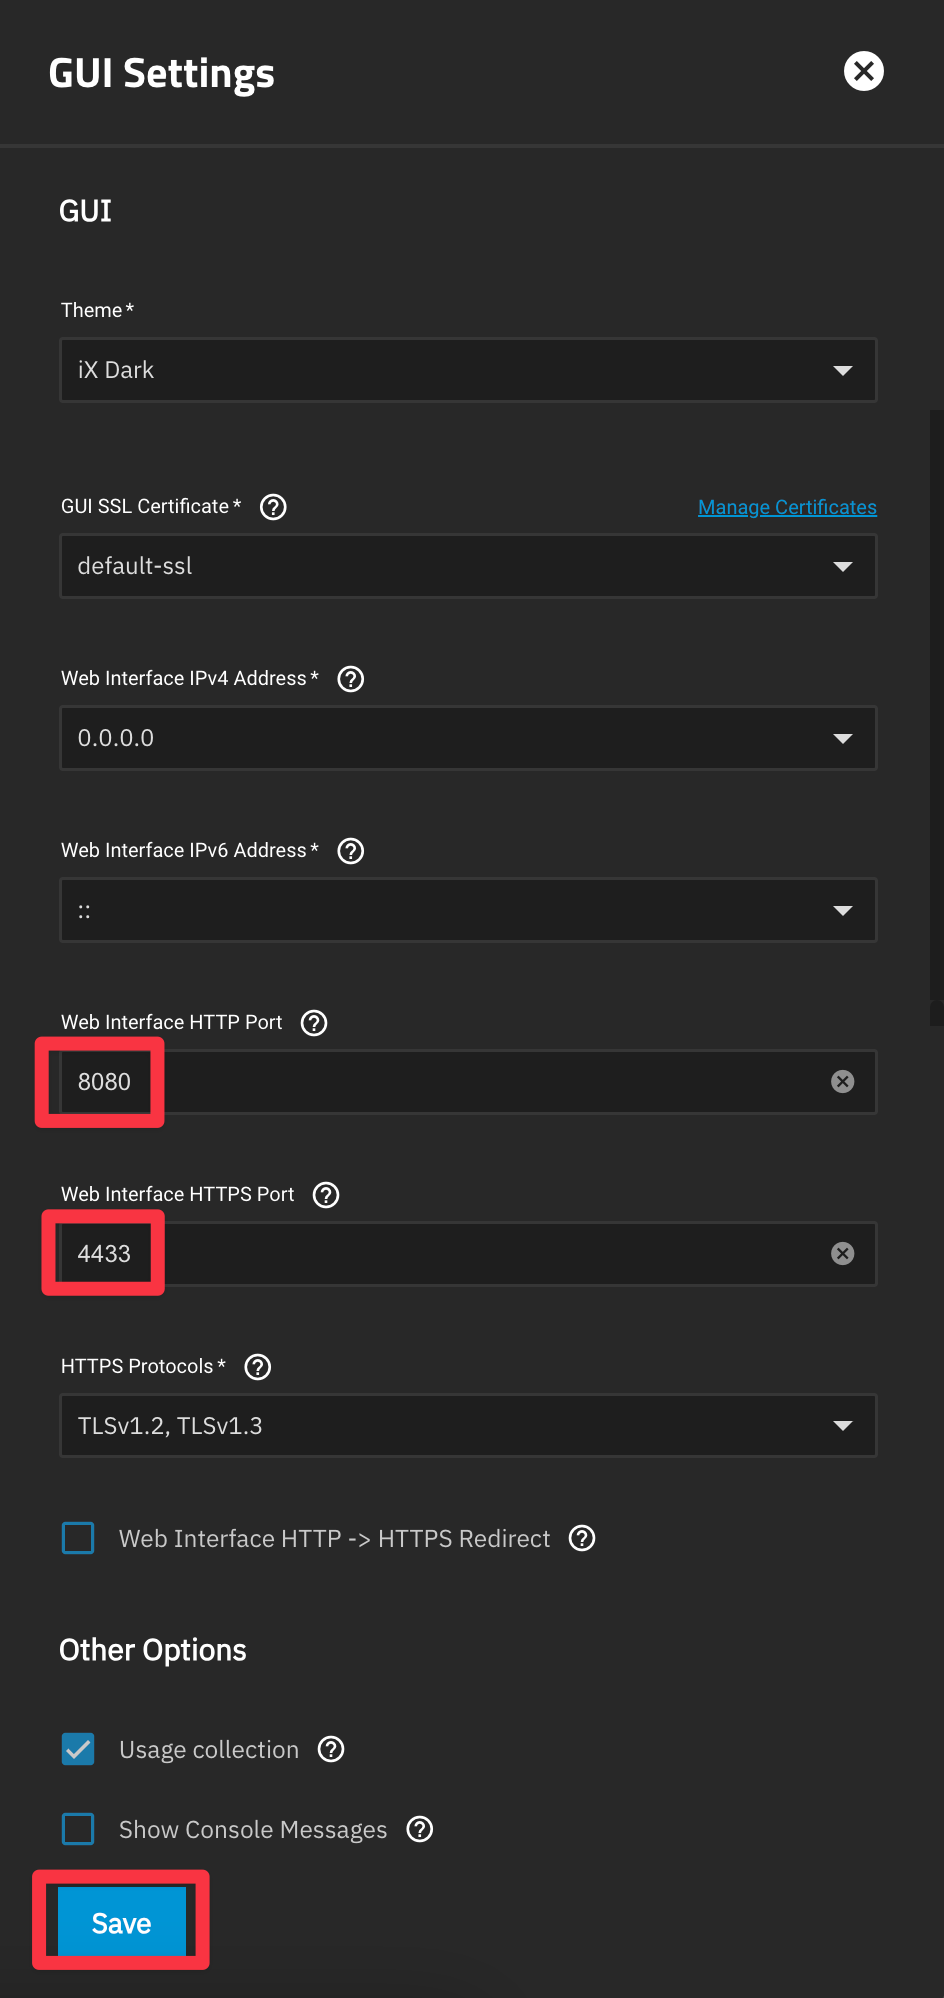
Confirm and continue when prompted to reboot the web services. Note that restarting the web services may take up to a minute, so be patient.

Update your URL; in my case, it changed from
https://192.168.1.150tohttps://192.168.1.150:4433. You can ignore SSL warnings at this point.
Installing Docker
App Configuration
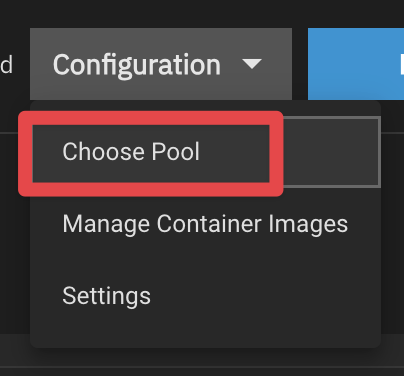
- Select App from the sidebar, then the down arrow on Configuration.
Note: I’m assuming you have never installed any TrueCharts and you have a fresh install of TrueNAS. If this isn’t the case, your screens may not be in the same state as mine.
In my case, I chose my spinning disks. I’m only planning on running Traefik and a couple of smaller containers like Pi-hole or Plex, so placing this on my faster storage is just not needed. Select Choose.
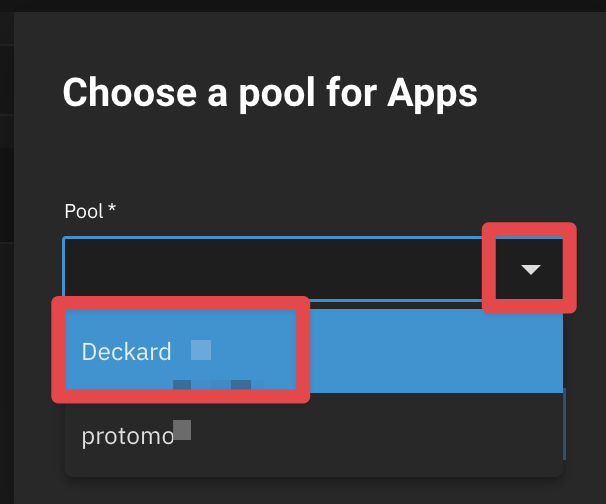
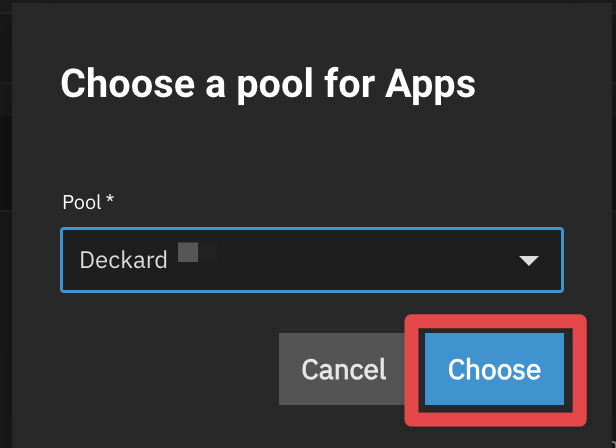
- Once you see the green check box, you are ready to head back to the Shell.

Locating the Docker Installation
Login to SSH. Now that you have SSH’ed into your shell, you will want to elevate to SUDO for the rest of the commands. This is accomplished by the following command. When asked for a password, ensure you put in your admin password. Note that typing the password is not needed if you selected “allow all sudo commands with no password.”
1
sudo su
Your screen should look like this:

Run the following commands to confirm the docker directory and navigate:
1
2
ls /mnt/.ix-apps/
cd /mnt/.ix-apps/docker
Folder Structure
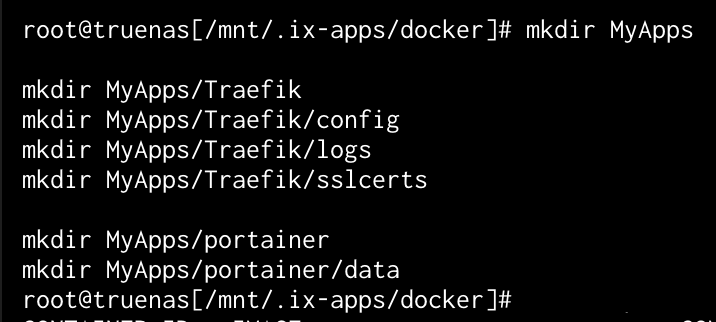
Now I chose to place a new folder contained in the Docker installation directory /mnt/.ix-apps/docker. This may not be wise long-term as upgrades could cause issues, but for now, this is where I placed it. I created a folder for MyApps and the folder structure for Traefik and Portainer for the demonstration.
Create folders for your applications:
1
2
3
4
5
6
7
mkdir MyApps
mkdir MyApps/traefik
mkdir MyApps/traefik/config
mkdir MyApps/traefik/logs
mkdir MyApps/traefik/sslcerts
mkdir MyApps/portainer
mkdir MyApps/portainer/data
Note: I’m just using Portainer; as a test application, to show SSL working in a later step. Feel free to omit this.
Configuring Traefik
Now the following is quite manual. I highly recommend using something like Ansible or using SSH to push the files from your local to these directories, but for these demonstrations, I will just show you each file that I create and provide the contents of each configuration file. Again, this is just a demonstration, so you may have other needs and can update the files as you see fit.
Navigate to:
1
cd /mnt/.ix-apps/docker/MyApps/traefik
Create and edit the docker-compose.yaml file:
1
nano docker-compose.yaml
Contents of docker-compose.yaml
1
2
3
4
5
6
7
8
9
10
11
12
13
14
15
16
17
18
19
20
21
22
23
24
25
26
27
28
29
30
31
32
33
services:
  traefik:
    image: traefik:latest
    container_name: traefik
    security_opt:
      - no-new-privileges:true
    ports:
      - "80:80" # Traefik
      - "443:443" # Traefik
      - "8181:8080" # Traefik Dashboard # I recommend removing it once you prove the system is working.
    networks:
      - proxy_network
    volumes:
      - type: bind
        source: /mnt/.ix-apps/docker/MyApps/traefik/config # These are the paths I chose, but I suspect they can be placed elsewhere.
        target: /etc/traefik
      - type: bind
        source: /mnt/.ix-apps/docker/MyApps/traefik/sslcerts # These are the paths I chose, but I suspect they can be placed elsewhere.
        target: /etc/traefik/sslcerts
      - type: bind
        source: /mnt/.ix-apps/docker/MyApps/traefik/logs # These are the paths I chose, but I suspect they can be placed elsewhere.
        target: /var/log/traefik/
      - /var/run/docker.sock:/var/run/docker.sock:ro
    environment:
      - CLOUDFLARE_API_KEY=Your_Key_Here
      - CLOUDFLARE_EMAIL=Your_Email_Here
      - CLOUDFLARE_PROPAGATION_TIMEOUT=90 # I never needed this before, but for some reason, I needed it on TrueNAS.
    restart: unless-stopped

networks:
  proxy_network:
    external: true
Navigate to the config directory and create two files:
1
2
cd config
nano traefik.yaml
Contents of traefik.yaml
1
2
3
4
5
6
7
8
9
10
11
12
13
14
15
16
17
18
19
20
21
22
23
24
25
26
27
28
29
30
31
32
33
34
35
36
37
38
39
40
41
42
43
44
45
46
47
48
49
50
51
global:
  checkNewVersion: true
  sendAnonymousUsage: false

log:
 level: INFO
 format: common
 filePath: /var/log/traefik/traefik.log

accessLog:
  format: common
  filePath: /var/log/traefik/access.log

# Comment this section out after you have completed testing.
api:
  dashboard: true
  insecure: true
# Comment this section out after you have completed testing.

entryPoints:
  web:
    address: :80
    http:
      redirections:
        entryPoint:
          to: websecure
          scheme: https
  websecure:
    address: :443

certificatesResolvers: # Note I'm using Cloudflare, but if you want to use a different type of challenge, then you will need to update this section.
  production:
    acme:
      email: Your_Email_here@gmail.com
      storage: /etc/traefik/sslcerts/acme.json
      caServer: "https://acme-v02.api.letsencrypt.org/directory"
      dnsChallenge:
        provider: cloudflare
        resolvers:
          - "1.1.1.1:53"

serversTransport:
  insecureSkipVerify: true

providers:
  docker:
    exposedByDefault: false
    network: proxy_network
  file:
    directory: /etc/traefik
    watch: true
Create the dynamic.yaml file:
1
nano dynamic.yaml
Contents of dynamic.yaml
1
2
3
4
5
6
7
8
9
10
11
12
13
14
http:
  routers:

  services:

  middlewares:
    default-headers:
      headers:
        browserXssFilter: true
        contentTypeNosniff: true
        forceSTSHeader: true
        stsIncludeSubdomains: true
        stsPreload: true
        stsSeconds: 15552000
Move back one directory:
1
cd ..
Creating External Network
Now you will need to create the external network since, in the Docker Compose file, it’s listed as external. Both Traefik and the test Portainer image you will use for testing will share this network. Remember, the name here must match the docker-compose.yaml file you created or edited in the previous step.
1
docker network create proxy_network
Spin up Traefik:
1
docker compose up -d
Now open a web browser and navigate to the Traefik dashboard at http://192.168.1.150:8181. Note: You need to update the IP based on the IP of your TrueNAS. Port 8181 is defined in the Docker Compose file and should be turned off if not in use for security reasons. This is something you can put behind a password, but that is out of scope for this post.
If your screen looks like the above, you have a Docker Compose Traefik instance running on TrueNAS SCALE 24.10 (Electric Eel), ready to pull in static or Docker-based labels for SSL certificates.
Next, I will share my Docker Compose for Portainer, just so you can see the labels I use. I’m not going to go into details about it. Note that I’m also not covering DNS here. Once you set your compose file up for a domain(traefik.http.routers.frontend.rule=Host), you need to point your DNS to the IP of the TrueNAS server, so that Traefik can not only serve the site but also allow for the validated certificate to show. If you need DNS help, I’m happy to assist—just leave me a line in the comments.
Portainer
Here is the compose file I used.
1
2
3
4
5
6
7
8
9
10
11
12
13
14
15
16
17
18
19
20
21
22
23
24
25
services:
  portainer:
    image: portainer/portainer-ce:sts
    container_name: portainer
    volumes:
      - /var/run/docker.sock:/var/run/docker.sock
      - /mnt/.ix-apps/docker/MyApps/portainer/data:/data
    networks:
      - proxy_network
    restart: unless-stopped
    labels:
      - "traefik.enable=true"
      - "traefik.http.routers.frontend.rule=Host(`demo1.spaceterran.com`)"
      - "traefik.http.routers.frontend.entrypoints=websecure"
      - "traefik.http.services.frontend.loadbalancer.server.port=9000"
      - "traefik.http.routers.frontend.service=frontend"
      - "traefik.http.routers.frontend.tls.certresolver=production"

networks:
  proxy_network:
    external: true

volumes:
  data:
    driver: local
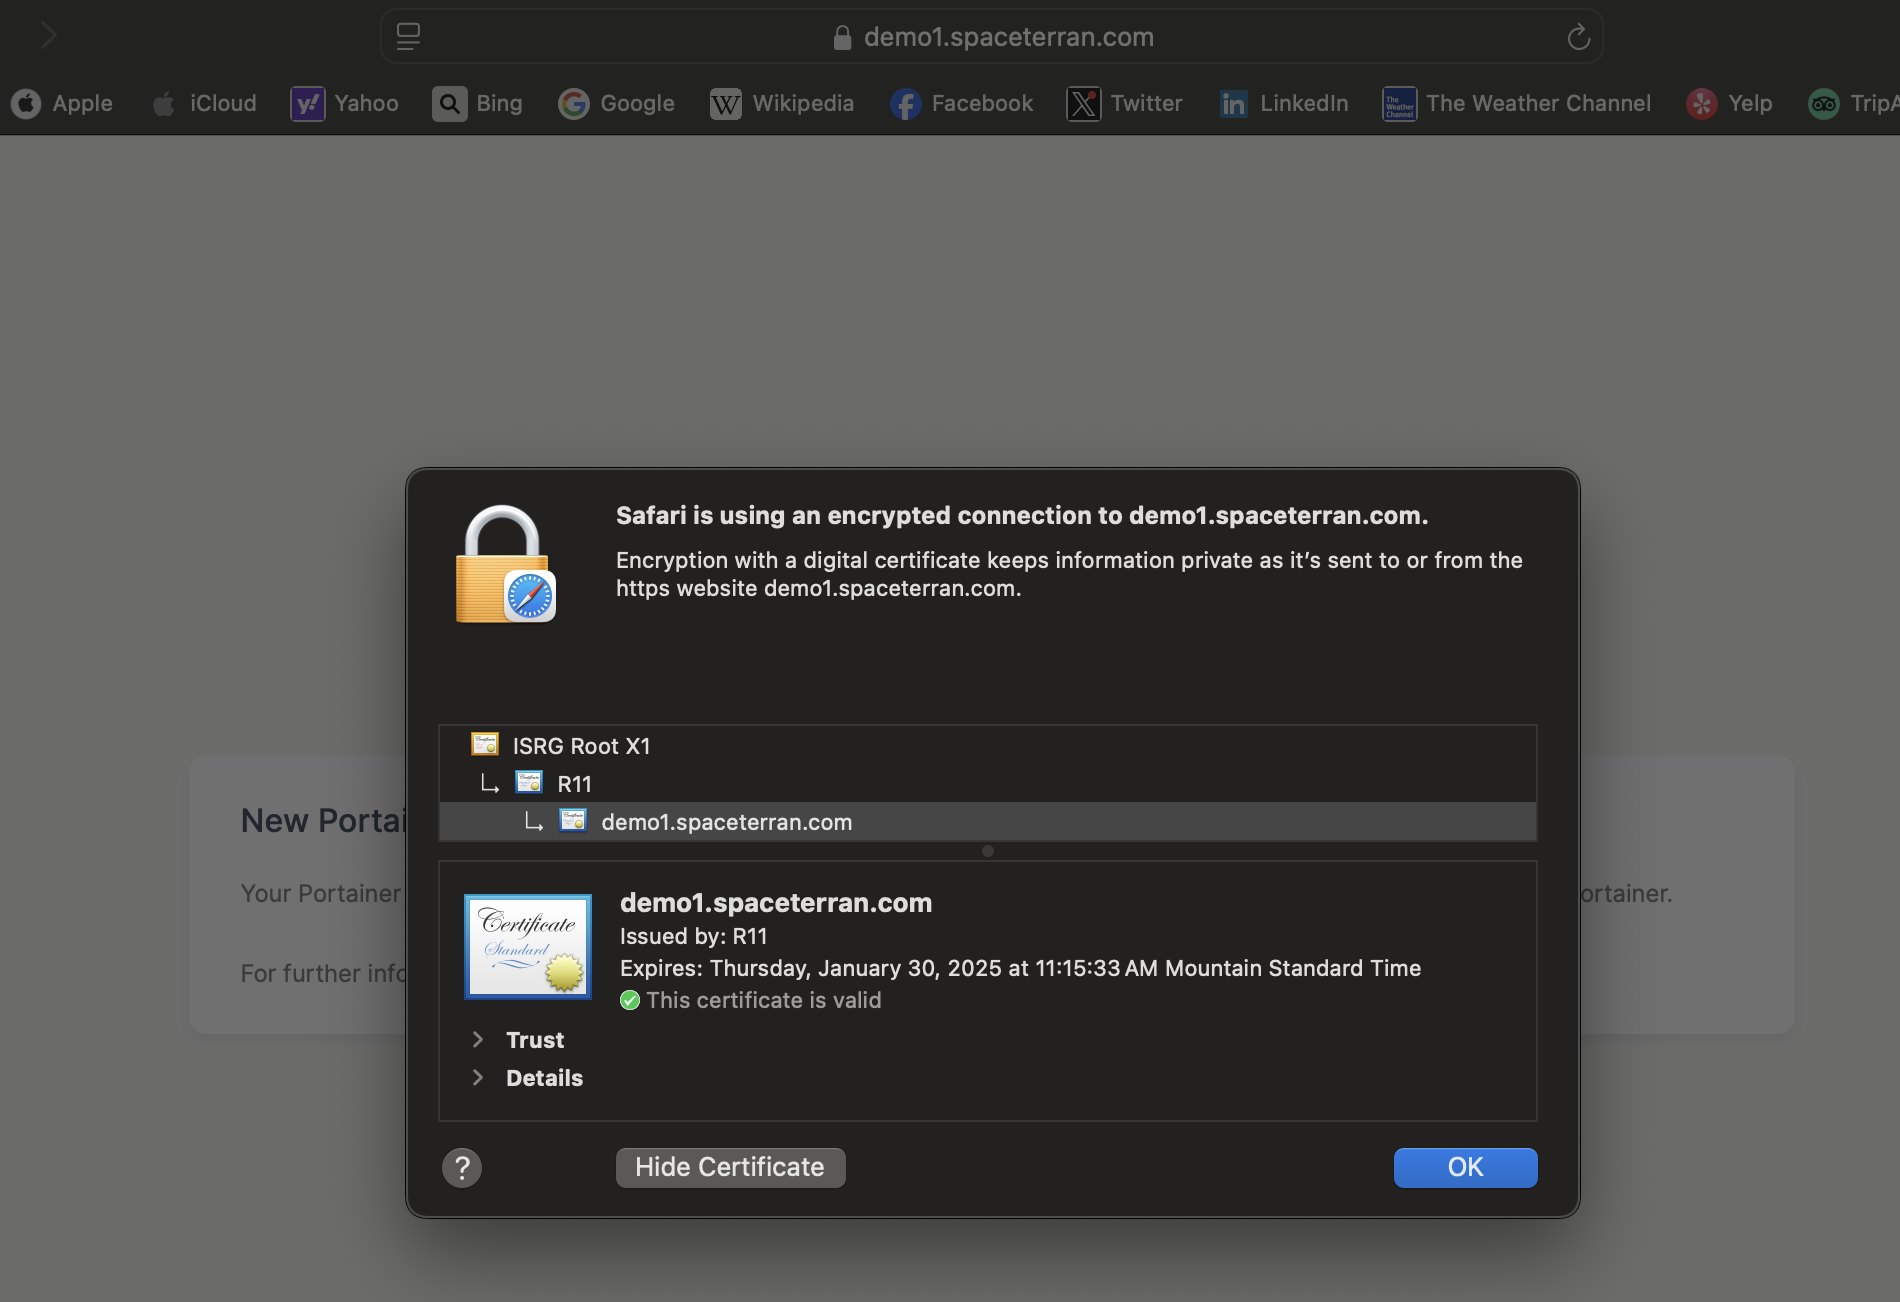
Here is a screenshot of the site with a working SSL certificate!
Closing
Thanks for diving into the TrueNAS SCALE 24.10 (Electric Eel) setup with me! 🐍⚡ With Docker Compose and Traefik!
Got questions or cool tweaks to share? Jump into the comments and let’s chat! Sharing insights and tales helps me ensure these articles are making a difference.
If you enjoyed this guide, why not pass it along to a fellow tech enthusiast?
See you in the comments! 🚀💬


