Monitor your external IP with Docker and Gatus
Build a lightweight Flask Docker container that monitors your public IP and integrates with Gatus to alert you when your external IP changes.

Introduction
Have you ever needed to monitor your external IP address? How about if you have an IPsec VPN that you need to maintain?
Below, I will walk you through how I put together a solution that I use in my home lab. Word of caution: the method I’m using is far from the best or most recommended approach, and there are other options out there for specific use cases like DynDNS or NoIP.com, etc.
Real-World Scenario
My actual use case was for a friend of mine who will be traveling, and I have set up an IPsec VPN to a travel router. The issue is that the travel router, for whatever reason, does not support a DNS name for the IPsec endpoint. This forced me to at least want to know when my IP changed so I could provide them with an update.
Setting Up the Environment
My environment consists of a Ubiquiti UDM Pro with Quantum Fiber (CenturyLink) as my ISP, and each time my CenturyLink ONT restarts or CenturyLink sends an update, my IP changes. In fairness, this really doesn’t happen all that often, but I love to overbuild or create overkill solutions in my home lab :) I mean, why else would I have this blog or spend so much time automating/scripting everything, lol!
Back to my environment… I use Gatus for all my other monitoring within my lab, so I wanted to leverage that and its ability to email me if something changes state.
Choosing the Monitoring Tool - Gatus
I am already a big fan of Gatus, mainly because it is entirely configured based on a YAML configuration file, making it very easy to keep my configurations under source control and push through my CI/CD pipeline. Check it out here: Gatus. They also offer a paid version here: gatus.io.
If you jump over to their GitHub, and scroll down to the Quick Start Guide, you’ll find the example snippet that led me to this approach. Essentially what it does is poll (or check) every 60 seconds to see if there is a response code of 200 and whether the body of the page contains <h1>Example Domain</h1>. This is the logic I wanted for my Docker container: a quick page that displayed my current IP, so that I can check for a state change.
1
2
3
4
5
6
  - name: make-sure-header-is-rendered
    url: "https://example.org/"
    interval: 60s
    conditions:
      - "[STATUS] == 200"                          # Status must be 200
      - "[BODY] == pat(*<h1>Example Domain</h1>*)" # Body must contain the specified header
Developing the Monitoring Solution
Now let’s talk about creating my container. I needed something extremely lightweight, and I wanted to base it on Python, which I have been using more and more these days. After a bit of research, I found Flask to be suitable for my simple website. I haven’t ever written anything with Flask before; much of my experience with Python these days involves manipulating the MS Graph API for my day job, so I’m sure when someone looks at this they may wonder… did a child write this, haha :) Anyway, this was the basis of the Docker container.
Docker Setup
The Dockerfile is fairly basic, using the Python slim Docker image hosted on Docker Hub. Note, in a production environment or for general best practices, you might want to lock in a version for the base Docker image of python:slim. Check out more about the image tags here: Python Docker Hub.
I set the timezone for obvious reasons and then created a non-root user.
1
2
3
4
5
6
7
8
9
10
11
12
13
14
15
16
17
18
19
20
21
22
23
24
25
26
27
28
29
30
31
32
33
34
# Use the slim version of the official python image
FROM python:slim

# Install tzdata package and setup MST timezone
RUN apt-get update && \
    apt-get install -y --no-install-recommends tzdata && \
    ln -fs /usr/share/zoneinfo/America/Denver /etc/localtime && \
    dpkg-reconfigure -f noninteractive tzdata && \
    apt-get clean && \
    rm -rf /var/lib/apt/lists/*

# Set Time Zone environment variable to America/Denver
ENV TZ=America/Denver

# Set the working directory in the Docker container
WORKDIR /app

# Copy the requirements.txt file from local machine to the Docker container
COPY requirements.txt .

# Install the Python dependencies from the requirements.txt file
RUN pip install --no-cache-dir -r requirements.txt

# Copy all files from the local project directory to the Docker container
COPY . .

# Create a non-root user 'nonroot' for running the application
RUN adduser --disabled-password --gecos "" nonroot

# Switch to the nonroot user for security
USER nonroot

# Define the default command to be executed when the container starts
CMD [ "python", "./app.py" ]
Flask Application
The application, as mentioned, uses Python and Flask. It runs at boot, as you can see from this line above: CMD ["python", "./app.py"]. My Python script utilizes a Flask-based web application that’s designed to continuously monitor and display the public IP address of the server (Docker container). Every 60 seconds, it fetches the container’s public IP via the url https://api.ipify.org and updates this information on the generated website. It logs each successful IP fetch attempt, keeps track of the last successful check time, and maintains a counter of how many fetches have been executed. Additionally, it calculates and displays the container’s uptime since the script’s initiation.
1
2
3
4
5
6
7
8
9
10
11
12
13
14
15
16
17
18
19
20
21
22
23
24
25
26
27
28
29
30
31
32
33
34
35
36
37
38
39
40
41
42
43
44
45
46
47
48
49
50
51
from flask import Flask
import requests
from apscheduler.schedulers.background import BackgroundScheduler
from pytz import timezone
from datetime import datetime, timedelta

app = Flask(__name__)

# Initialize global variables for tracking state across scheduled fetches
last_successful_check = None  # Time of the last successful IP fetch
current_ip = None  # Most recently fetched public IP address
run_count = 0  # Counts how many IP fetches have been attempted
start_time = datetime.now(timezone('MST'))  # Store the script start time with timezone

def fetch_public_ip():
    global last_successful_check, current_ip, run_count  # Indicates modification of global variables
    try:
        # Request to get the current public IP from 'ipify' API
        ip = requests.get('https://api.ipify.org').text
        current_ip = ip  # Update the global variable with the new IP
        last_successful_check = datetime.now(timezone('MST'))  # Update the last successful fetch time
        run_count += 1  # Increment the counter for each fetch attempt
        # Log the successful fetch and the current run count
        print(f'Successful IP check at {last_successful_check.strftime("%I:%M:%S %p %Z")}: {ip}')
        print(f'Run count: {run_count}')
    except Exception as e:
        # Output error message if the IP fetch fails
        print(f'Failed to fetch IP: {e}')

@app.route('/')
def hello_world():
    current_time = datetime.now(timezone('MST'))  # Get the current time with timezone
    uptime = current_time - start_time  # Calculate the script uptime
    # Format the uptime into a more readable string format
    uptime_str = str(timedelta(seconds=int(uptime.total_seconds())))

    # Provide different responses based on whether an IP has been fetched successfully
    if last_successful_check and current_ip:
        return (f'<h1>Your current public IP address is: {current_ip}</h1>'
                f'<h2>Last checked successfully at: {last_successful_check.strftime("%I:%M:%S %p %Z")}</h2>'
                f'<h2>Number of checks run: {run_count}</h2>'
                f'<h2>Uptime: {uptime_str}</h2>'
                f'<h2>Start Time: {start_time.strftime("%I:%M:%S %p %Z")}</h2>')
    else:
        return '<h1>The IP has not been checked yet.</h1>'

if __name__ == '__main__':
    scheduler = BackgroundScheduler()  # Set up a background scheduler
    scheduler.add_job(fetch_public_ip, 'interval', seconds=60)  # Schedule the IP fetch to run every 60 seconds
    scheduler.start()  # Start the scheduler
    app.run(host='0.0.0.0', port=80, use_reloader=False)  # Run the Flask app accessible over the network
Here is a screenshot of the application running:
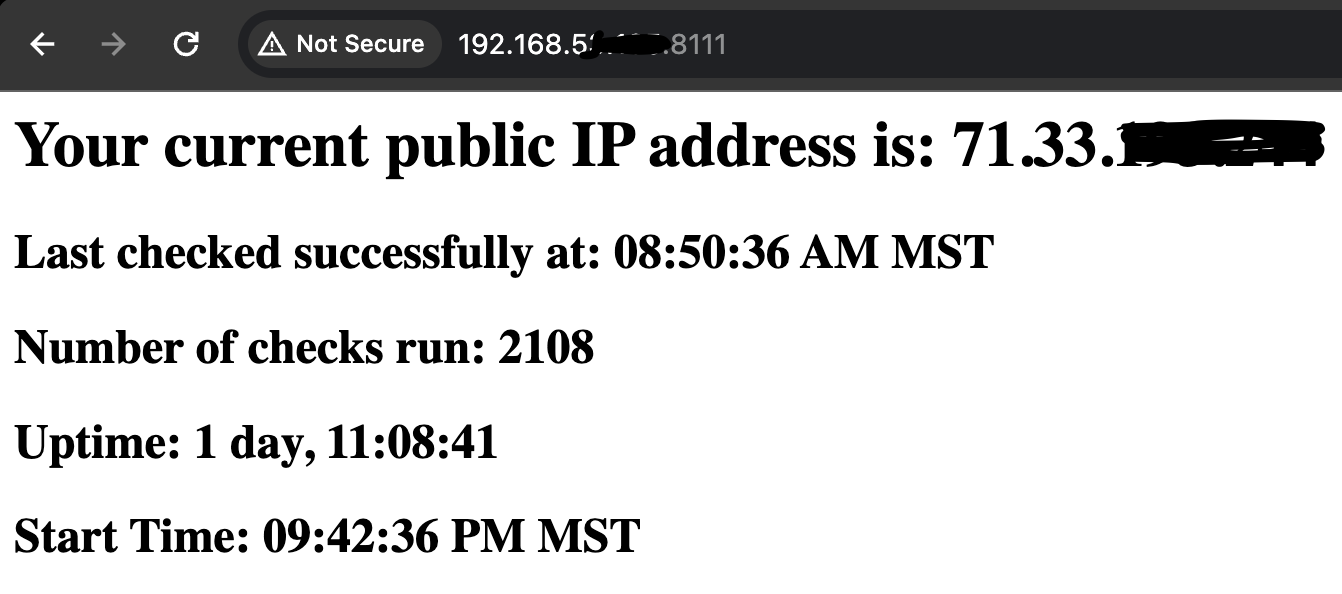
You can access the application via a web browser, on the IP and Port set when launching the Docker container.
Ansible Deployment
Below, I will also share my Ansible script used to build and deploy this container. This playbook copies the necessary files, dockerfile.j2 & app.py.j2, which must be in the same directory from where the playbook is being executed. One note on the requirements.txt: it is currently being created without specifying specific versions. This is not recommended, as when the Docker build step occurs, it will just pull the latest version, which in the future could cause incompatibilities or other issues that might prevent this script from functioning correctly. I have noted the versions that were installed when this blog post was created in the code comments below. Using the latest versions may work, but if you encounter issues, set specific versions and update based on each package maintainer’s recommendation.
1
2
3
4
5
6
7
8
9
10
11
12
13
14
15
16
17
18
19
20
21
22
23
24
25
26
27
28
29
30
31
32
33
34
35
36
37
38
39
40
41
42
43
44
45
46
47
48
49
50
51
52
53
54
55
56
57
58
59
60
61
62
63
64
65
66
67
68
69
70
71
72
---
# The playbook configures and deploys a Flask application on a Docker container hosted on the 'dockerhost' server.
- hosts: dockerhost   # Target host where operations will be performed
  become: yes    # Gain higher privileges

  vars:   # Define variables used within the playbook
    container_name: whatismyip  # Name of the Docker container
    container_image_name: what-is-my-ip  # Name of the Docker image to be built
    path: /mnt/shared/what-is-my-ip  # Path on the server where files will be stored

  tasks:  # Tasks to be executed on the target host
  - name: Create a directory for the IP app
    # Task to create the necessary directory
    file:
      path: "{{ path }}"  # Path variable defined above
      state: directory  # Ensure the path is a directory
      mode: '0755'  # Set permissions

  - name: Add dockerfile
    # Task to create the Dockerfile from a template
    ansible.builtin.template:
      src: dockerfile.j2  # Source template file
      dest: "{{ path }}/Dockerfile"  # Destination path on the server

  - name: Add app.py
    # Task to create app.py from a template
    ansible.builtin.template:
      src: app.py.j2  # Source template file
      dest: "{{ path }}/app.py"  # Destination path on the server

  - name: Add requirements.txt
    # Task to create requirements.txt with specified content
    copy:
      dest: "{{ path }}/requirements.txt"  # Destination path on the server
      content: |  # Content of the requirements.txt file
        flask # 3.0.3
        requests # 2.31.0
        APScheduler # 3.10.4
        pytz # 2024.1
        Werkzeug # 3.0.3

  - name: Remove existing Docker container
    # Task to remove any existing container with the same name
    community.docker.docker_container:
      name: "{{ container_name }}"  # Container name variable
      state: absent  # Ensure the container is absent

  - name: Remove existing Docker image
    # Task to remove any existing image with the same name
    community.docker.docker_image:
      name: "{{ container_image_name }}"  # Image name variable
      state: absent  # Ensure the image is absent

  - name: Build Docker Image
    # Task to build a Docker image from the Dockerfile
    community.docker.docker_image:
      source: build  # Build from Dockerfile
      build:
        path: "{{ path }}"  # Path to the directory containing Dockerfile
      name: "{{ container_image_name }}"  # Name of the image
      tag: latest  # Tag the image as latest

  - name: Run Docker container
    # Task to start a Docker container from the image
    community.docker.docker_container:
      name: "{{ container_name }}"  # Name of the container
      image: "{{ container_image_name }}:latest"  # Image name with tag
      ports:
        - "8111:80"  # Port mapping from host to container
      state: started  # Ensure the container is running
      restart_policy: unless-stopped  # Auto-restart policy
Gatus configuration
Below is the code snippet of my Gatus configuration. If you need help setting up Gatus, please refer to the links above for self-hosting Gatus and using the code below. Ensure you update it based on your IP and requirements.
1
2
3
4
5
6
7
8
9
10
11
12
13
14
15
endpoints:
  - name: Home - Public IP
    url: "http://192.168.x.x:8111" # This is the URL of your newly created Docker container. Update it to the correct DNS name or IP.
    interval: 60s
    conditions:
      - "[STATUS] == 200"
      - "[BODY] == pat(*<h1>Your current public IP address is: 71.33.x.x</h1>*)" # The string to check for. Update the IP address based on your current IP.
    client:
      insecure: true
      ignore-redirect: false
      timeout: 10s
    alerts:
      - type: email
        description: "healthcheck failed"
        send-on-resolved: true
Conclusion and Feedback
I’d love to hear in the comments section below if this helped you or how you might be monitoring your public IP and for what purpose. And as always, I’m open to feedback on my scripts and approach, always looking to improve!